Lemon Sugar Cookies

From Dorie’s Cookies 

Makes about 60 cookies 

23/4 cups (374 grams) all-purpose flour

1 teaspoon baking soda

1/2 teaspoon baking powder

1 or 2 lemons

11/2 cups (300 grams) sugar

2 sticks (8 ounces; 226 grams) unsalted butter, and cut into chunks, at room temperature

1/2 teaspoon fine sea salt

1 large egg, at room temperature

1 teaspoon pure vanilla extract

Sugar, for dredging

Position the racks to divide the oven into thirds and preheat it to 350 degrees F. Line two baking sheets with parchment paper or silicone baking mats.

Whisk the flour, baking soda and baking powder together. Finely grate the zest of 1 lemon and squeeze the juice. If you don’t have 1/4 cup, squeeze the juice from the second lemon.

Put the sugar and lemon zest in the bowl of a stand mixer, or in a large bowl in which you can use a hand mixer. Using your fingertips, mash and rub the ingredients together until the sugar is moist and fragrant. If you’re working with a stand mixer, fit it with the paddle attachment. Add the butter and salt to the bowl and beat on medium speed until the mixture is smooth, about 2 minutes. Beat in the egg, followed by the vanilla and lemon juice. Turn off the mixer, add half of the dry ingredients and mix on low speed until they’re almost incorporated. Scrape down the sides and bottom of the bowl, add the rest of the flour and beat on low speed until the dough comes away from the sides of the bowl.

Pour some sugar into a bowl. Using a small cookie scoop, scoop out level portions of dough or use a teaspoon to get rounded spoonfuls. Roll each portion into a ball between your palms, drop into the sugar, roll it around to coat and place on the baking sheets. These cookies spread dramatically, so make sure to leave about 2 inches between them.

Bake the cookies for 8 to 14 minutes, rotating the baking sheets top to bot- tom and front to back at the midway mark. If you bake them for 8 to 10 minutes, you’ll get pale cookies that will be chewy; bake them for 12 to 14 minutes, until they’re barely golden around the edges (the bottoms will be lightly browned), and you’ll get cookies that are chewy in the center and crisp around the edges. The cookies will be crackle-topped and too soft to lift from the baking sheets. Transfer the baking sheets to racks and let the cookies cool completely before you move them. Repeat with the remaining dough, always using cool baking sheets.

Storing: These keep in a tightly covered container at room temperature for up to 5 days. Packed airtight, they’ll be good for up to 2 months in the freezer.

Note: I froze half the dough but made a mistake and defrosted the wrong thing. I decided to try to make the cookies anyway, because my family was expecting them. I microwaved it for 1 minute which turned out to be much too long. The dough came out soft and a little warm. Continued on. They were not as easy to roll but when baked, they were even better than the first batch.

My suggestion: Let the dough “melt” a little and bake a little longer. They will come out thinner and crispier.

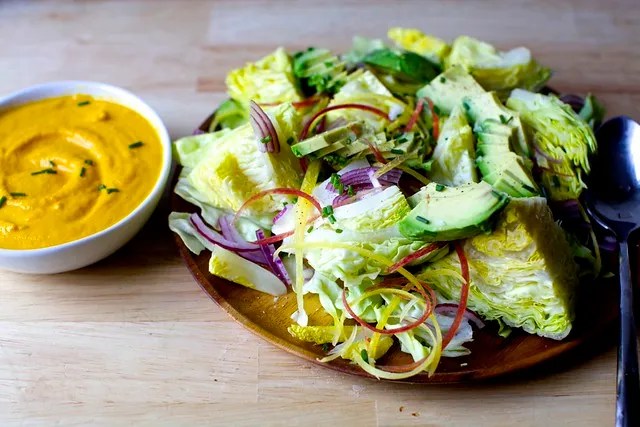
Avacado Salad With Carrot Miso Dressing

Smitten Kitchen

My daughter made this for a family dinner, and it was an instant hit. We have eaten this dressing in a favorite Japanese restaurant and couldn’t believe that she found it online.

It is a vibrant, restaurant-style blended dressing poured over fresh lettuce, sliced red onion, and tender avocado.

DRESSING
1 large carrot, peeled and roughly chopped
1 small shallot, peeled and roughly chopped
2 tablespoons roughly chopped fresh ginger. (If you don’t want as loud of a ginger bite, use one tablespoon instead of two.) 
2 tablespoons white miso
2 tablespoons rice vinegar
2 tablespoons toasted sesame seed oil
1/4 cup grape seed or another neutral oil
2 tablespoons water
ASSEMBLY
1 small/medium head of lettuce (I used Bibb)
1/4 red onion, thinly sliced
1 avocado, quartered and thinly sliced


Make the dressing:
 Whiz the carrots, shallot and ginger in a blender or food processor until finely chopped. Scrape down the sides, then add the miso, vinegar and sesame oil. While the machine running, slowly drizzle in the grape seed oil and the water.

Assemble salad: Trim and chop lettuce into small wedges. Arrange on a platter. Scatter onion and avocado on top. If you’d like, sprinkle some flaky sea salt and black pepper over the salad at this point. Dollop with plenty of dressing and serve with remaining dressing on the side.

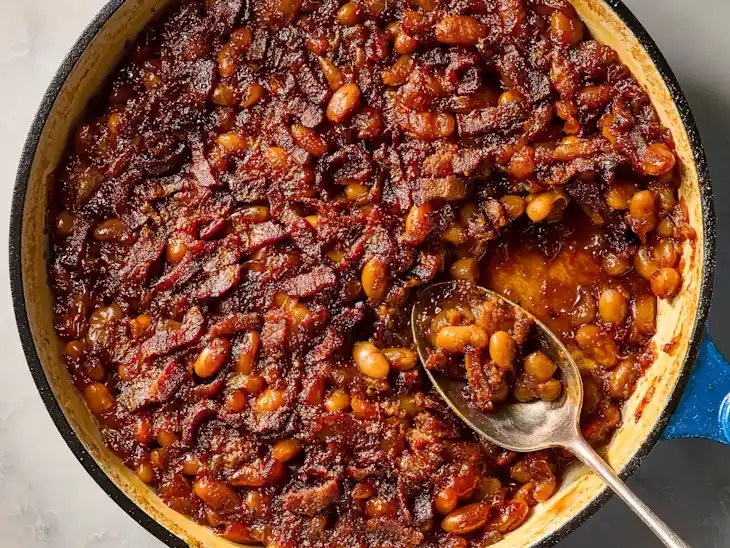
Baked Beans

My son’s Fiancée made baked beans as part of a lovely brunch. It was served, among other dishes, with soft scrambled eggs. A delicious combination!

Ingredients (4 servings)

2 cans cannellini beans (or 3 cups cooked, drained)

½ onion, finely chopped

2 cloves garlic, minced

2 tbsp tomato paste

¼ cup ketchup (or crushed tomatoes)

2 tbsp maple syrup or brown sugar

1 tbsp molasses (key for classic flavor)

1 tbsp Dijon mustard

1 tsp smoked paprika

1 tbsp apple cider vinegar

1–2 tbsp olive oil

Salt & pepper to taste

 Optional (but very traditional):

2–3 strips bacon, chopped

1. Build the flavor base

Heat olive oil in a pan over medium heat.

Add onion → cook until soft (5–7 min).

Stir in garlic and cook 1 more minute.

2. Make the sauce

Add:

Tomato paste

Ketchup / tomatoes

Maple syrup

Molasses

Mustard

Smoked paprika

Stir and let it bubble for 2–3 minutes.

3. Add beans

Fold in the cannellini beans + a splash of water (¼ cup).

Season with salt & pepper.

4. Bake (key step!)

Transfer to an oven-safe dish.

Bake at 350°F (175°C) for 25–35 minutes until thick and slightly caramelized on top.

🔥 Tips for the best baked beans

Don’t skip molasses → that deep, classic baked-bean flavor

Add a splash more vinegar at the end → balances sweetness

Chickpeas With Baby Spinach

By Martha Rose Shulman

This is a lovely vegetarian dinner if you need a break from animal protein. You can serve it on its own, with couscous, rice or pasta, or over a thick slice of toasted bread rubbed with garlic. Personally I didn’t love the spinach in this dish and opted to have it on the side.

INGREDIENTS

Yield: Serves three

  • 1 tablespoon olive oil
  • 1 medium onion, chopped
  • 2 garlic cloves, minced
  • 1 teaspoon cumin seeds, lightly toasted and ground
  • Salt, preferably kosher salt
  • Freshly ground black pepper, to taste
  • 1 tablespoon tomato paste
  • 1 (15-ounce) can chickpeas, drained and rinsed
  • 1 cup chicken or vegetable stock, or water (I used water.)
  • Cayenne, to taste
  • 1 (6-ounce) bag baby spinach
  • PREPARATION
  • Step 1: Heat the olive oil in a large, heavy saucepan over medium heat and add the onion. Cook, stirring, until tender, about five minutes. Add the garlic, cumin, tomato paste and ½ teaspoon salt. Cook, stirring for one to two minutes, until fragrant and the tomato paste has turned a darker color. Add the chickpeas, the stock or water, and the cayenne, and bring to a simmer. Cover, reduce the heat, and simmer 10 minutes.
  • Step 2: Stir in the spinach, a handful at a time, stirring until each addition of spinach wilts. Add salt to taste and simmer uncovered, stirring often, for five minutes. Add lots of freshly ground pepper, taste and adjust salt and cayenne, and serve.
  • TIPS
  • Another way to make this dish is to blanch the spinach separately in salted boiling water for 10 to 20 seconds. Transfer to a bowl of ice water, drain and squeeze dry. Add to the chickpeas as in step 2, but stir together for only two to three minutes.
  • Advance preparation: This can be made up to a day ahead and refrigerated, but when you reheat you’ll want to add a little more liquid. It can sit on top of the stove for a few hours.

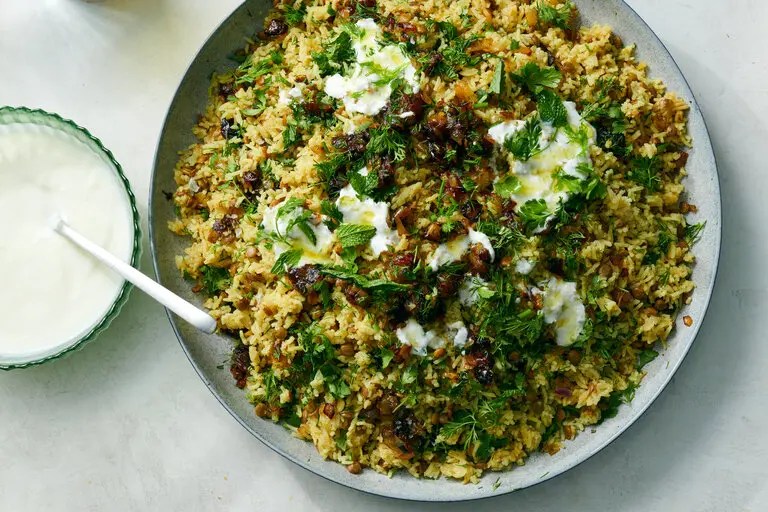
Adas Polo ba Khorma (Persian Lentil Rice With Dates)

Recipe from Nasim Alikhani
Adapted by Melissa Clark

The lentils and rice are cooked together in the same pot, then layered with a mixture of caramelized onions and plump, sweet dates, as well as chopped fresh herbs for brightness. A dollop of yogurt on top adds a tart and creamy touch.

I made the recipe for my family, and it was well received. I used regular lentils which took a while longer to cook, but if you can find the French green ones, they need a shorter cooking time.

Feel free to improvise on this basic recipe, adding nuts for crunch, stirring in other spices like cardamom, ginger and saffron, and substituting the likes of raisins, dried apricots or dried cranberries for the dates. The dates, however, were sublime.

Ingredients:

1 cup green lentils, rinsed

2 tablespoons ground cinnamon

½ teaspoon ground turmeric

2 tablespoons plus 1 teaspoon kosher salt (such as Diamond Crystal), more as needed (I used less salt.)

2½ cups basmati rice, rinsed and drained

1 cup chopped fresh herbs, such as cilantro, dill, mint or a combination

1 cup plain whole-milk yogurt, for serving (optional)

For the onion – date mixture:

  • 6 tablespoons extra-virgin olive oil or clarified butter, plus more for serving (see Tip)
  • 2 yellow onions, finely diced
  • 12 fresh Medjool dates, pitted and diced

Preparation:
Bring 4 cups water to boil in a medium saucepan over high heat. Add the lentils, cinnamon, turmeric and 2 tablespoons salt. Stir well to combine, breaking up any clumps. Cover and reduce heat to medium. Simmer until the lentils are cooked but still have a bite, 7 to 10 minutes. Drain lentils and set aside.

Using the same medium saucepan, bring 2 cups water to a boil. Add the rice, cooked lentils, 1 teaspoon salt and enough hot water to cover the rice by 1 inch. Cook, uncovered, until all the water is absorbed, 10 to 14 minutes.

  • Reduce heat to low, wrap the pot lid in a clean kitchen towel, cover the pan and let the rice steam for 10 minutes. Fluff rice with a fork; taste and add salt if needed. (I used paper towels to cover the pot. Placed lid on top)
    • While the rice is cooking, prepare the onion-date mixture: In a skillet, heat 4 tablespoons oil or clarified butter until hot but not smoking. Add onions and a pinch of salt, and cook until the onions are dark golden and a little crispy, 9 to 14 minutes. Transfer onions to a bowl and return the skillet to the heat.
    • Add remaining 2 tablespoons oil to the skillet and, once hot, add the dates and warm them through, 1 to 2 minutes. Stir dates into the bowl with the onions.
    • To serve, spoon a layer of rice and lentils into a warmed serving bowl, then add a layer of onion-date mixture and sprinkle with chopped herbs. Keep alternating layers, ending with the onion-date mixture and a final sprinkling of herbs. Drizzle with more oil and top with a dollop of yogurt if you like.

    TIP

    • If you don’t have clarified butter but would like a buttery flavor, you can use 2 tablespoons unsalted butter to warm the dates, and then top the dish with more melted butter. Be sure to use olive oil (or clarified butter) for the onions or they might burn.

    Lemon Dill Salmon


    This is not the best picture of this recipe. If you can, search the website “I live in my kitchen” for lemon, dill, pecan salmon. There is an excellent video of this on instagram. Note: tsp=teaspoon; tbs=tablespoon

    For this moist and flavorful salmon, this is what you need:
    Salmon fillet, approx 1.5-2 lbs, skinless preferred
    1/2 tsp salt

    Sauce:
    2 tbs olive oil
    1 lemon, juice only
    3 tbs chopped dill
    1 tbs honey
    1/2 tsp salt

    1/3 cup chopped pecans
    Salt
    Pepper

    1. Line a baking dish with crinkled parchment paper.
    2. Lay the salmon on a cutting board and pat it dry. Sprinkle with salt on both sides and place it on top of the parchment paper.
    3. Gently score crisscross 1/4” deep slits with a sharp knife. Make sure not to cut all the way through to the bottom, just score the top of the fish.
    4. Mix the sauce ingredients well. You want the sauce to fully absorb the dill flavors.
    5. Using a spoon, scoop the sauce and drizzle it onto the fish, spreading it and making sure it goes into the slits you made with the knife. Leave two tablespoons of the sauce for later. Sprinkle a pinch of salt and fresh black pepper.
    6. Bake at 425 for 18-20 min. Open the oven and spread the pecans on.
    7. Bake for another 3 min just to toast the pecans lightly.
    8. Remove from the oven and sprinkle on the rest of the sauce. Decorate with fresh dill and serve!

    Pecans can be subbed with pieces of pistachios or almonds but author thinks pecans are the best.

    if you want to make a whole salmon (3-4 lbs), you’ll have to double the sauce; 3 tbs of oil will be enough. Bake for 22-25 min.

    Can be served at room temperature.

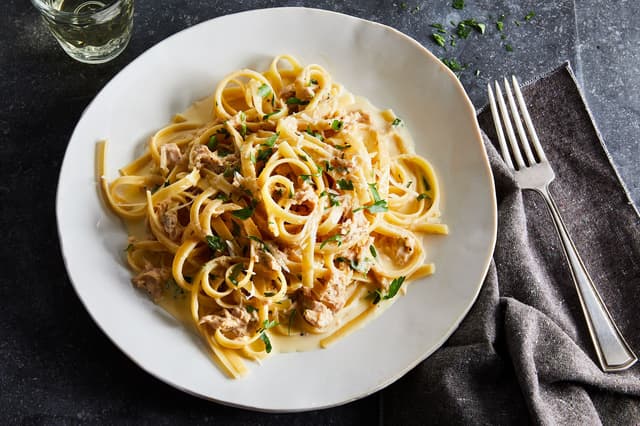
    Marcella Hazan’s Fettuccine col Sugo di Tonno con Aglio e Panna

    SERVES about 4 PREP TIME 5 Minutes COOK TIME 12 Minutes

    From Marcella’s Italian Kitchen: “Canned tuna is a familiar ingredient in pasta sauces. Although I was once very fond of it, there was a harshness to the taste of tuna sauces, both other cooks’ and my own, that began to trouble me. It took a long while, as my dissatisfaction grew, for me to identify its cause. At last I knew: Cooking altered tuna’s taste. I looked for other ways to make a sauce that did not require cooking the tuna. The one that pleased me most is derived from the buttery sauce described [elsewhere in Marcella’s Italian Kitchen]…I added garlic, egg, parsley, cream, and Parmesan, mixing everything by hand rather than in a processor to obtain a grainier, more interesting texture.”

    Note: Sorry I haven’t posted in a long time but its not been for a lack of trying. Lately my luck has been turning, and I’m beginning to find recipes I want to share with you. This one is so simple but delicious. The only problem is that everyone has to eat it at the same time. It cannot be reheated.

    Ingredients

    • 1 ( 7-ounce) can of Italian-style tuna packed in olive oil
    • 1/2 teaspoon garlic chopped very fine (can use more)
    • 2 tablıespoons parsley (can use more)
    • 1 egg, lightly beaten
    • 3 tablespoons butter, softened to room temperature
    • 2/3 cup heavy cream
    • Salt
    • Black pepper in a grinder
    • 1/2 cup freshly grated Parmigiano-Reggiano (Parmesan), plus additional for the table (can be already grated)
    • Fettuccine (Marcella calls for homemade. You can use 3/4 lb boxed dried fettuccine)

    Directions

    • Step 1: Drain the tuna of all its oil and put it in a mixing bowl.
    • Step 2: Add the garlic, parsley, egg, butter, cream, salt, liberal grindings of pepper, and the 1/2 cup of grated cheese. Mix well until all the ingredients are thoroughly amalgamated, using a fork to break up and mash the tuna. Taste and correct for salt and pepper.
    • Step 3: Drop the pasta into a pot of abundant boiling salted water and cook until it is done but firm to the bite, drain, and toss immediately with the tuna mixture. Serve at once, with additional grated cheese available on the side.

    Butternut Squash Soup

    A creamy, flavorful butternut squash soup that’s easy to make. This is a recipe that I made when I was macrobiotic. It can be vegan or you can add a splash of cream at the end.

    INGREDIENTS

    • 2½ pounds pre-cut butternut squash (7 to 8 cups, cubed; see note)
    • 2 Tablespoons olive oil
    • 1 medium yellow onion, roughly chopped
    • 3-4 cups vegetable stock or water
    • ¾ cup heavy cream, plus more for serving (optional)
    • Salt (optional)
    • handfull of fresh dill or 1 teaspoon chopped fresh thyme or 1 teaspoon curry powder, for a different flavor profile. Don’t use cream with dill.

    INSTRUCTIONS

    First, chop the veggies! Sauté the onion until it becomes translucent, add the squash, and cook until it begins to soften. Pour in the broth and simmer until the squash becomes tender, about 20 minutes

    Let cool slightly and pour the soup into a blender, working in batches if necessary, and blend until smooth. If using dill, blend with soup. (An immersion blender is very helpful here.) If your soup is too thick, add up to 1 cup more broth. If desire, add thyme or curry powder after blending. Season to taste and serve with parsley, pepitas (shelled pumpkin seeds), and crusty bread.

    Note: For the best flavor and texture, use fresh butternut squash in this recipe. Frozen squash can release extra water when cooked, which may dilute the soup.

    My daughter made this soup and used half butter and half olive oil and chicken stock instead of water or vegetable stock. Then she mixed in a generous portion of fresh cream after the soup was blended. Salt and pepper to taste.


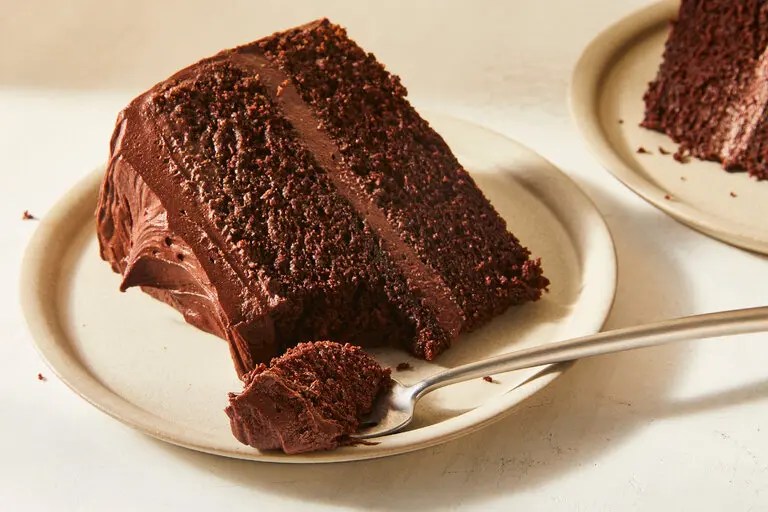
    Easy Chocolate Cake

    By Yossy Arefi

    This classic chocolate layer cake is “deeply chocolatey, fluffy and even tastier if you make it the day before you plan to eat the cake. The layers bake up nice and flat, so you don’t have to bother with trimming. The sour cream makes the cake layers nice and plush, and adds a bit of tanginess to the American-style buttercream made with confectioners’ sugar, a hefty dose of cocoa powder, vanilla and plenty of salt to balance the flavor. Cover the cake with swoops and swirls of buttercream”, and top with sprinkles if desired.

    I made this cake in a rectangular 9×13 pyrex baking dish and halved the frosting ingredients. Use your search engine for the math, if necessary. It came out great! Don’t use the parchment paper here. Not necessary.

    One reader’s comment: The cake keeps in the fridge for a long time and keeps improving. It also freezes very well as individual slices wrapped in plastic wrap and foil.

    INGREDIENTS

    Yield: 12 to 16 servings

    FOR THE  CAKE

    • ¾ cup/180 milliliters neutral oil (like canola or grapeseed), plus more for greasing the pans
    • 2 ¼ cups/450 grams granulated sugar
    • 2 cups/256 grams all-purpose flour
    • 1 ¼ cups/110 grams cocoa powder, sifted if lumpy
    • 1 ½ teaspoons baking powder
    • 1 ½ teaspoons baking soda
    • 1 ½ teaspoons kosher salt (such as Diamond Crystal)
    • 1 cup/240 grams sour cream
    • 3 large eggs
    • 1 tablespoon pure vanilla extract
    • 1 cup/240 milliliters prepared hot coffee

    FOR THE CHOCOLATE BUTTERCREAM

    • 1 ½ cups/340 grams unsalted butter, softened to room temperature
    • 3 ¾ cups/450 grams confectioners’ sugar, sifted if lumpy
    • 1 ½ cups/140 grams cocoa powder, sifted if lumpy
    • ¼ cup/60 grams sour cream
    • ¼ cup/60 milliliters lukewarm milk, plus more as needed
    • 1 tablespoon vanilla extract
    • ¾ teaspoon kosher salt (such as Diamond crystal)
    • Sprinkles (optional), for decorating

    PREPARATION

    1. Make the cake: Set a rack in the center of the oven and heat oven to 350 degrees. Generously grease two 9-inch baking pans and line the bottoms with parchment paper.
    2. In a large bowl, combine the granulated sugar, flour, cocoa powder, baking powder, baking soda and salt. Whisk until well combined and no lumps remain.
    3. In a medium bowl, whisk the oil with the sour cream, eggs and vanilla.
    4. Add the sour cream mixture to the dry ingredients. Using an electric mixer, mix on low until the dry ingredients are moistened, then turn the mixer to medium-high and mix for 2 minutes, scraping the bottom and sides of the bowl halfway through. Carefully fold the coffee into the batter using a flexible spatula.
    5. Divide the batter evenly into the prepared pans and tap them on the counter a few times to release any large air bubbles. Bake until puffed and a toothpick inserted into the center comes out clean, 35 to 40 minutes. Set the pans on a wire rack and let the cakes cool for about 20 minutes. Next, run a thin knife around the edges of the pan and carefully turn the cakes out onto the rack to cool completely. (You may have to tap the pans gently on the rack to release each cake.)
    6. While the cakes bake, clean the mixing bowl and make the buttercream: Add the butter to the bowl and mix on medium-high until smooth, stopping the mixer occasionally to scrape the bottom and sides of the bowl. Add the confectioners’ sugar, cocoa powder, sour cream, milk, vanilla extract and salt. Mix on low until the sugar and cocoa are moistened, then turn the speed up to medium-high and whip until smooth and fluffy, about 5 minutes, adding a bit more milk (1 teaspoon at a time) if necessary to make a smooth and light buttercream. Scrape the bowl occasionally to ensure that the buttercream is evenly mixed. Taste and add a bit more salt if desired. (The buttercream can be kept at room temperature while the cake finishes baking and cooling.)
    7. Assemble the cake: Just before frosting the cake, stir the buttercream vigorously with a flexible spatula to knock out any large air bubbles. (This will help to make the final buttercream smooth.) Add a small spoonful of buttercream to a serving plate or cardboard cake round and place one layer of cake on top, puffed-side down. Spread about 1 heaping cup of buttercream evenly over the top of the cake. Place the second layer on top of the buttercream, puffed-side down, and press gently. Spread a thin layer of buttercream over the top and sides of the cake (be careful not to transfer crumbs back into the bowl of frosting), then refrigerate the cake until the buttercream is firm, about 30 minutes.
    8. Spread the remaining buttercream over the top and sides of the cake and top with sprinkles, if using.
    9. Store the cake at room temperature for up to 4 days. Use a hot, clean and dry knife for the tidiest slice

    Cowboy Caviar

    By Margaux Laskey

    I made this the other night for a family barbecue. It was a wonderful accompaniment to our hamburgers and hot dogs. The canned beans may be a little soft for some, but if you want a firmer bean in the dish, try chick peas. Author suggests eating this with a pile of tortilla chips. 🙂

    INGREDIENTS

    Yield:8 cups

    • ⅓ cup olive oil
    • ¼ cup red wine vinegar
    • 3 to 4 garlic cloves, minced
    • 1 teaspoon granulated sugar
    • Kosher salt and black pepper
    • 3 plum tomatoes, cored, seeded if desired, and diced
    • ½ red onion, finely diced (about ¾ cup)
    • 1(15-ounce) can black beans, rinsed
    • 1(15-ounce) can black-eyed peas, rinsed
    • 1½ cups fresh corn kernels (from about 2 to 4 cobs) or thawed, drained frozen sweet corn (about 8 ounces)
    • 1 red, green or yellow bell pepper, seeded and finely diced
    • 1 jalapeño, seeded and finely diced
    • ½ cup chopped cilantro leaves and tender stems, plus more for garnish, if desired
    • 1 scallion, white and green parts, chopped, for garnish (optional)
    • Tortilla chips, for serving

    PREPARATION

    1. Make the dressing: In a medium bowl, whisk the olive oil, vinegar, garlic, sugar, ½ teaspoon salt and ½ teaspoon pepper to combine.
    2. Add the tomatoes, red onion, black beans, black-eyed peas, corn, bell pepper, jalapeño and cilantro. Toss to combine and season with salt and pepper to taste. Cover with plastic wrap and refrigerate for 2 hours before serving.
    3. To serve, toss well and season to taste. Sprinkle with scallions and serve with tortilla chips.