Another delicious potato recipe! The recipe is simple and mostly hands off; the potatoes just need to be tossed every so often for even crisping. While russets can be used, Yukon Gold potatoes are soft and creamy, and the longer they roast, the crispier the outsides will become. (Just don’t overdo it, or they’ll dry out.)
Note: I didn’t have chili powder. Still tasty.
INGREDIENTS
Yield: 4 to 6 servings
Chopped parsley or cilantro (optional)
1 teaspoon black pepper
1 teaspoon ancho chile powder or chili powder of choice, to taste (1/4 teaspoon may be enough) (optional)
½ teaspoon smoked paprika (1/4 teaspoon may be enough)
½ teaspoon garlic powder
½ teaspoon onion powder
½ teaspoon dried oregano
2 pounds Yukon Gold potatoes, diced into 1-inch cubes (about 5 large potatoes)
⅓ cup extra-virgin olive oil
1½ teaspoons kosher salt (such as Diamond Crystal), plus more to taste (start with 1 teaspoon)
Step 1: Heat the oven to 425 degrees with the rack in the center position.
Step 2: In a small bowl, combine the black pepper, chili powder (if using), smoked paprika, garlic powder, onion powder and dried oregano.
Step 3: Place the potatoes in the middle of a sheet pan, drizzle with olive oil and toss well. Sprinkle on the salt and toss again. Add the spice mix and toss once more, until the potatoes are coated. Scatter the potatoes across the pan in a single layer.
Step 4: Roast potatoes, turning with a flat metal spatula every 10 minutes, until they’re tender, about 35 minutes. If you’d like them crispier on the outside, continue roasting for 10 to 15 minutes more. Don’t worry if any pieces stick to the pan a little; just give them a little nudge with the spatula. (The crispy bits are the best.) Taste and sprinkle with more salt, if needed. Sprinkle with fresh herbs, if using, and serve.
This delicious recipe comes together quickly, and the thinly sliced asparagus doesn’t need much time to cook. Feel free to swap with any other vegetables that cook in just a few minutes, like thinly sliced green beans, or frozen peas. My only suggestion Is to use a little less honey, although my son loved this as printed.
1 tablespoon coconut or canola oil (can use 2-3 tablespoons of oil)
12 ounces asparagus, trimmed and thinly sliced on an angle
1 teaspoon unseasoned rice vinegar
1 lime, cut into wedges (optional)
PREPARATION
In a small bowl or measuring cup, stir together ¼ cup water with the honey, pepper and ½ teaspoon salt; set honey mixture aside.
In a medium bowl, stir together the flour, turmeric and 1 teaspoon salt. Add the chicken and toss until coated.
In a medium (10-inch) nonstick skillet, heat the oil over medium-high. Add the chicken and cook until the turmeric is fragrant and the chicken is golden brown on both sides, 2 to 3 minutes per side.
Add the asparagus, season with salt, stir to combine and cook until crisp-tender, 1 to 2 minutes.
Add the honey mixture and cook, stirring, until the chicken is cooked through and the sauce has thickened, 2 to 3 minutes.
Remove from heat and stir in the vinegar. Season to taste with salt and pepper. Serve with lime squeezed over top, if you like.
Note: I highlighted all the additions of salt. Definitely not necessary! Also, recipe needs the lime.
A master class from J. Kenji Lopez on how to make the best roasted potatoes ever!
J. Kenji López-Alt
WHY IT WORKS
Parboiling the potatoes with a hint of vinegar builds strong pectin bonds and a starchy outer layer of potato.
Tossing the parboiled potatoes in a bowl with a metal spoon creates microscopic nooks and crannies that make for an extra-crunchy exterior.
Roasting in animal fat adds extra crispness and rich flavor.
So what is it that makes a potato crisp?
The potatoes above have been parboiled, then tossed roughly in a bowl with a metal spoon until their surfaces were roughed and scratched up. All those microscopic nooks and crannies will make for an extra-crunchy surface.
Potato Variety (Note)
You can use any type of potatoes you like for this, but there’s a tradeoff:
Starchy russet potatoes will produce the crispest crust because of their high starch content, with fluffy, powdery interiors.
Yukon gold potatoes (what I’ve used here) will produce crusts that are still very crisp, but not quite as crisp as that of a russet. They’ll also have interiors that are more creamy than fluffy. Some people like this contrast of textures. I’m on the fence, so I usually alternate between the two varieties.
Red waxy potatoes will have the creamiest texture of all, but will lack a very strong, crisp crust. I don’t recommend them for this purpose.
Fat (Note)
Next question: What’s the best fat to use?
Well, if you can get your hands on it, this:
People often tout the awesomeness of duck fat with potatoes, and for good reason: It tastes awesome. Duck fat has a distinct richness and aroma that get absorbed very easily into the surface of a spud. On top of that, it’s got plenty of saturated fat and a high smoke point, which makes it an ideal medium for crisping up fried or roasted foods. (In general, the higher the saturated fat content of an oil, the more efficiently it’ll crisp foods.) Can’t get duck fat? Well, turkey fat or chicken fat collected from roasted birds will do just fine.
Bacon fat and rendered lard are also fine choices, as is just about any sort of animal-derived fat.
If you must use it, extra-virgin olive oil will certainly do admirably well, though you won’t get quite the same level of crispness you’d get out of an animal fat.
Once your potatoes are tossed in fat and seasoned well, all you’ve got to do is roast them in an extremely hot oven until they crisp up.
I roast mine directly on a heavy rimmed baking sheet—they have a tendency to stick to foil. The key is to make sure you let the underside crisp up completely before you even attempt to lift or flip them. If the potatoes don’t come off relatively easily, you run the risk of breaking off the tops, leaving the crisp bottom cemented to the bottom of the pan. This is not an ideal situation.
Moral: Your potatoes will release themselves from the pan when they’re good and ready. Don’t force them.
Ingredients:
4 1/2 pounds (2 kg) russet potatoes (see note), rinsed, peeled if desired, and cut into 2-inch chunks
Kosher salt
1 tablespoon (15 ml) white vinegar
1/4 cup (60 ml) duck fat (see note)
Freshly ground black pepper
12 sprigs thyme
Directions:
Adjust oven racks to lower and upper positions and preheat oven to 500°F (260°C). Place potatoes in a large saucepot and cover with cold water by 1 inch. Add 2 tablespoons (28g) salt and vinegar. Bring to a boil over high heat, reduce to a simmer, and cook until exteriors are tender, about 5 minutes. Potatoes should show slight resistance when poked with a paring knife or a cake tester. Drain potatoes and transfer to a large bowl.
Add fat to bowl with potatoes. Season with pepper and more salt to taste, then toss with a large metal spoon until exteriors are slightly bashed up and coated in a thin layer of potato/fat paste. Divide potatoes evenly between 2 heavy rimmed baking sheets. Spread thyme sprigs over potatoes.
Transfer baking sheets to oven and roast until bottoms of potatoes are crisp and golden brown, about 20 minutes total, swapping trays top for bottom and rotating them once halfway through roasting. Using a thin metal spatula, flip potatoes and roast until second side is golden brown, another 15 to 20 minutes. Discard thyme sprigs and serve.
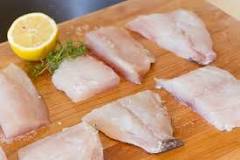
I want to incorporate more fish into my diet and have been trying out new recipes. This one, in which cherry tomatoes are roasted with garlic, shallots, sherry vinegar and a drizzle of honey, turn them into a sweet and savory condiment for simple roasted fish such as halibut, cod, haddock, sole or flounder. A thick white fish works best.
INGREDIENTS
Yield: 4 servings
1 pint cherry tomatoes, halved
½ cup thinly sliced shallots (about 1 large)
2 teaspoons minced garlic (about 2 large cloves)
2 tablespoons olive oil, plus more for brushing fish
1 tablespoon sherry or red wine vinegar
1 teaspoon honey
1 teaspoon kosher salt, plus more to taste
½ teaspoon black pepper, plus more to taste
4(6-ounce) skin-on mild white fish fillets, such as cod or halibut (I used skinless)
1 teaspoon freshly grated lemon zest (from about ½ lemon) (I used freshly squeezed lemon juice)
Chopped fresh basil, for serving
Chopped fresh mint, for serving
PREPARATION
Heat the oven to 400 degrees. Place the tomatoes, shallots and garlic in a 9-by-13-inch nonreactive baking dish. In a small bowl, whisk together the olive oil, vinegar, honey, salt and pepper. Pour over the tomatoes and toss to combine. Roast until the tomatoes have collapsed and the shallots are translucent, about 15 minutes.
While the tomatoes roast, pat the fish dry with paper towels, brush all over with olive oil, and season generously with salt and pepper.
Toss the tomatoes, move them to the sides of the dish and place the fish fillets, evenly spaced, in the center. Roast until the fish is cooked through and flakes easily with a fork, 10 to 12 minutes.
Sprinkle the entire dish with the lemon zest, basil and mint. Serve the fish with the tomatoes, spooning any remaining juices on top.
Note: I always roast 1/2 of a fresh lemon alongside the fish and then squeeze on hot lemon juice when serve.
Rubio’s is an American fast casual “Fresh Mex” or “New Mex”restaurant chain specializing in Mexican food, with an emphasis on fishtacos. I was introduced to them In a small, strip mall in Carlsbad, CA some years ago, by my LA family, and have been making them ever since. It’s an easy week night meal and so delicious. Earlier in this blog is a recipe for their beer battered fish. No need to start searching. I will repeat it.
You will need: beer battered fish, white sauce, shredded cabbage, flour or corn tortillas
Rubio’s Fish Taco Sauce:
1/2 cup yogurt, plain
1/2 cup mayonnaise
1/4 teaspoon cayenne (optional)
1/2 teaspoon cumin
1/2 teaspoon fresh dill
juice of 1 lime (start with 1/2)
1/2 teaspoon salt
1/2 teaspoon pepper
Beer Batter
1 cup All-Purpose Flour
Garlic Powder to taste
Freshly ground Black Pepper to taste
1 cup Beer of choice (Do not use Light Beer)
I also add 1 beaten egg and more beer if batter is too thick (egg is optional). Note: If not using the egg, batter will need more than 1 cup of beer. Add enough liquid until you get a consistency that is neither too thick or too thin. Coating is crispier without the egg.
White Sauce
In a small bowl, combine all ingredients. Mix well. Store in a tightly sealed container, in the refrigerator, until ready to serve (Can be done up to 3 days in advance).
Fish Fillets (a white flesh fish such as: flounder, cod, scrod, haddock)
Add salt to a bowl of cold water.
Wash fish by dipping in water.
Remove fillets to a paper towel-covered plate to drain. Allow fish to dry off completely before dipping into batter.
Beer Batter
In a large bowl, mix flour, garlic powder and pepper. Blend well.
Slowly pour in beer, stirring constantly, and mix until well blended. Set aside briefly.
Fry Fish
Pour vegetable oil into a deep skillet to about 1/2 to 1-inch deep.
Place skillet over medium heat and bring up to 375°F.
When oil is hot, dip fish, one at a time, into batter. Remove, allowing excess batter to drip off, and place in hot oil.
Repeat until you have filled the skillet to a single layer, but do not crowd and let them touch.
Cook fish until batter is crispy and golden brown, turning as needed.
Remove fillets to a paper towel-covered plate to drain.
Continue with remaining fillets as needed.
Fish Tacos
Heat corn tortillas very lightly and briefly in a separate dry skillet until they are soft and hot.
Place a tortilla onto a plate.
Place 1 prepared cod fillet in center.
Drizzle with white sauce.
Spoon about 1 – 2 tablespoons salsa over top (whatever salsa you prefer).
Scatter cabbage over all.
Add a squeeze of lime and fold tortilla over to serve.
“Green cabbage (though you could also use Savoy) becomes jammy and sweet when cooked with aromatic leeks and garlic for 15 minutes, a practically effortless concoction to toss with pasta. Cumin seeds add just the right amount of earthiness along with a subtle citrus tone; add more if you want a pronounced flavor, or substitute with fennel seeds or caraway. The walnuts balance out the sweetness of the cabbage and leeks, and introduce a slight bitterness and crunch. Store-bought roasted walnuts are a time saver here, but if you want them extra dark and crispy, toast them for 6 to 8 minutes in a 325-degree oven until deeply golden. If you have chives or scallions on hand, toss these in at the end for a lively finish.”
Note: I cheated on this recipe and mentally adjusted it for one. The method I used was some of this and some of that (cumin powder instead of seeds). Adam tasted the results and said it was good. He just added some red chili flakes.
INGREDIENTS
Yield:4 servings
1/4 cup olive oil
3 tablespoon unsalted butter
2 teaspoon cumin seeds
2 leeks, white and tender green parts, thinly sliced into rings
4 garlic cloves, finely chopped
2 pounds finely sliced green cabbage
Kosher salt (Diamond Crystal)
1 pound spaghetti or other long pasta
4 ounces pecorino, grated, plus more for serving
2 to 3 teaspoons freshly ground black pepper, plus more as needed
3 to 4 tablespoons lemon juice (from 1 large lemon)
1 to 1½ cups toasted walnuts, roughly chopped
Handful of chopped chives (optional)
Heat a large Dutch oven or pot over medium. Add the olive oil and butter. When the butter has melted, add cumin seeds and bloom for 15 seconds, then add the leeks, garlic, cabbage and 2 teaspoons salt, and stir for 3 to 4 minutes until wilted. Cover, reduce heat to medium-low and cook for 10 minutes without stirring. Check every few minutes to make sure the bottom is not burning. If needed, give it a stir.
After 10 minutes, remove the lid from the cabbage and stir. Cover and cook for another 4 to 5 minutes, until it is super sweet and tender. Taste and season with kosher salt.
Meanwhile, bring a large pot of salted water to a boil. Add the spaghetti and cook according to package instructions. When the pasta is ready, do not drain, but use tongs to drag the pasta out of its cooking water and straight into the pot with the cabbage. Add about 1 cup of pasta cooking water, along with the pecorino and the black pepper. Toss well to combine.
Add lemon juice. Taste, adjusting seasonings with more salt, pepper or lemon, if needed. To serve, scatter with walnuts and finish with more pecorino and chopped chives, if using.
Note: Because I am using less salt in my cooking, I now notice how much salt is in recipes. My suggestion is to go slow on the addition of salt. You can always add more.
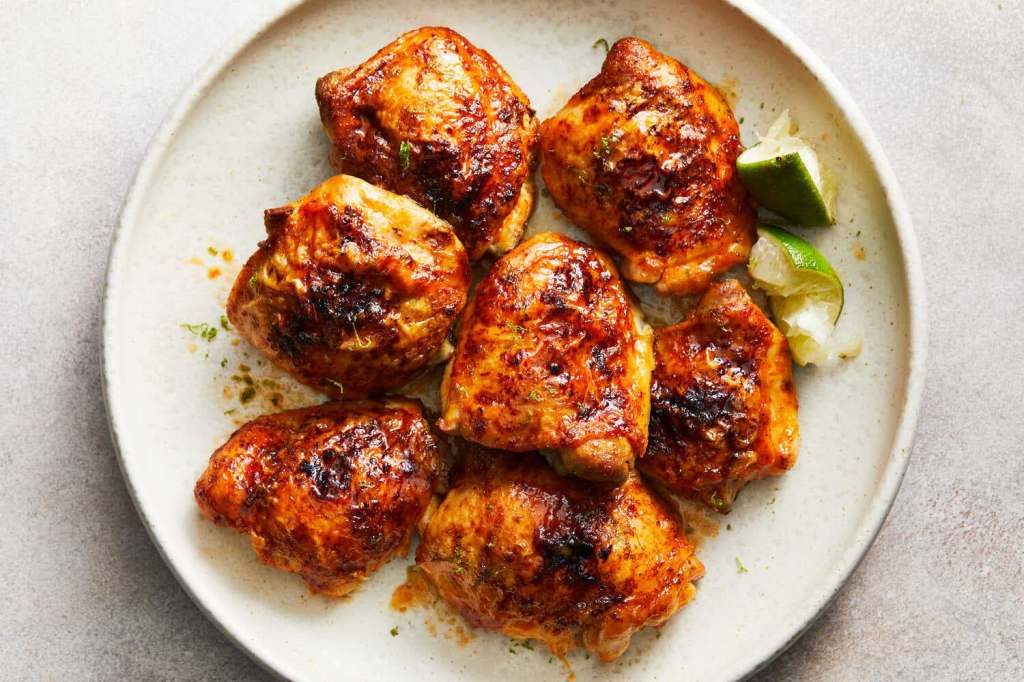
Sensational recipe! If you are not a fan of chicken thighs, you can use skin on, bone in breasts. Not sure how long to bake, but I would go with the time for the thighs, and then check. It would be better to use breasts that are not too thick. (I checked how to know when chicken is fully cooked: when it reaches 165 degrees on a meat thermometer.)
Generously seasoned with salt, pepper, and onion and garlic powders, these sweet and spicy chicken thighs are roasted at a high temperature to maximize the crispiness of the skin. Halfway through cooking, the chicken is brushed with a butter-and-hot-sauce blend. Finally, honey and lime zest are whisked into the remaining hot sauce butter to coat the fully baked chicken thighs. A squirt of tangy lime juice provides balance and the perfect finishing touch.
INGREDIENTS
Yield: 4 servings
3 pounds bone-in, skin-on chicken thighs
Salt and black pepper
½ teaspoon onion powder
½ teaspoon garlic powder
2 tablespoons butter (unsalted or salted), melted
2 tablespoons hot sauce (see Tip)
1 lime
2 tablespoons mild honey
PREPARATION
Heat the oven to 450 degrees. On a foil-lined rimmed baking sheet, season the chicken all over with salt, pepper, onion powder and garlic powder. Arrange the chicken skin side up then roast until browned, 20 minutes.
While the chicken is roasting, combine the melted butter and hot sauce and whisk to combine; transfer half to a separate bowl and set aside for later. After the chicken has roasted for 20 minutes, brush the chicken all over with the remaining butter mixture. Continue roasting until the chicken is golden brown and cooked through, 10 to 15 minutes more. Remove the chicken thighs from the oven. (Chicken should be fully cooked, but if not sure, you can roast for another 5-10 minutes.)
Zest the lime, then cut it in half. Add the honey and 1 teaspoon lime zest to the reserved butter-hot sauce mixture and whisk to combine, then brush over the chicken thighs and squeeze the lime juice on top. Serve immediately.
TIP
Different hot sauces have different levels of heat; choose one that suits your heat tolerance. Tabasco will be quite spicy, while a brand like Louisiana will yield a milder result.
This recipe was a surprise! Definitely a repeat. The cauliflower is reminiscent of the classic sweet and sour dishes served at Chinese American restaurants. Ketchup is the key ingredient, and it brings sourness, sweetness and umami to a simple blend of garlic, rice vinegar, soy sauce and sugar. Eat with rice or noodles.
(I’m not a fan of cooking with ketchup but have learned to tolerate it in specific recipes.)
INGREDIENTS
Yield:4 servings
6 tablespoons cornstarch (for the cauliflower) plus 1 teaspoon (for the sauce)
1 large cauliflower (about 2 pounds), cut into bite-size florets
Salt and pepper
Extra-virgin olive oil
3 tablespoons ketchup
3 tablespoons sugar
2 tablespoons rice vinegar
2 tablespoons soy sauce or tamari
1 garlic clove, finely chopped
2 scallions, thinly sliced
Rice or noodles, for serving
If using an oven, heat it to 425 degrees. If using an air fryer, heat it to 400 degrees, if preheating is recommended for your air fryer.
Place 3 tablespoons cornstarch in a large bowl. Add the cauliflower, season with a big pinch of salt and pepper, and toss to coat. Drizzle in 2 to 3 tablespoons oil and toss until well coated. Add 3 tablespoons cornstarch and toss. Drizzle in another 1 to 2 tablespoons oil and toss well again, making sure there is no dry cornstarch on the cauliflower.
If using an oven, grease a sheet pan with a drizzle of olive oil. Arrange the florets in a single layer on the baking sheet and roast for 10 minutes. Remove from the oven, flip the cauliflower to encourage even cooking, and return to the oven for another 8 to 10 minutes, cooking until it is tender and golden around the edges. (May need a little more time.)
If using an air fryer, you may need to work in batches depending on the size of your machine. Arrange the cauliflower in a single layer on the rack, and air fry for 16 minutes, tossing the cauliflower halfway through, to encourage even crisping. Cook the remaining cauliflower.
While the cauliflower cooks, make the sweet and sour sauce: Place the ketchup, sugar, vinegar, soy sauce and garlic in a small pot. Heat over medium, stirring, until the sugar melts and the mixture starts bubbling around the edges, about 1 minute. Whisk the remaining 1 teaspoon cornstarch with 2 tablespoons of water, then slowly pour the cornstarch slurry into the pot, stirring constantly, until the mixture thickens, about 1 minute.
To serve, transfer the cauliflower to a bowl and drizzle the sweet and sour sauce over the florets. Top with scallions. Serve with rice or noodles.
This is a wonderful recipe. It came together quickly and was juicy, tender, and very tasty. Adam was the cook and felt that it might have been too lemony. He suggested using 1 teaspoon of zest and 2 tablespoons of lemon juice. You can always add more. We served this with rice. Pierre Franey suggests serving with mashed Yukon Gold potatoes.
INGREDIENTS
Yield: 4 servings
½ cup flour for dredging
Salt and freshly ground pepper to taste
4 skinless boneless chicken breasts, about 6 ounces each
2 tablespoons olive oil
4 sprigs fresh thyme or 1 teaspoon dried
2 tablespoons finely chopped shallots
2 teaspoons finely chopped garlic
2 teaspoons grated lemon zest
3 tablespoons lemon juice
½ cup chicken broth, fresh or canned
2 tablespoons butter
PREPARATION
Season flour with salt and pepper, and dredge the chicken all over. Remove the excess flour.
Heat the oil in a heavy skillet large enough to hold the chicken pieces in one layer. Add chicken and cook, uncovered, over medium heat for 5 minutes or until lightly browned.
Flip the chicken and cook for 5 minutes more, or until cooked through. Carefully remove the oil from the skillet, leaving the chicken. Discard the oil.
Add the thyme, shallots and garlic, and cook for about a minute. Do not burn the garlic. Add the lemon rind, the lemon juice and the broth.
Scrape the skillet to dissolve the brown particles that cling to the bottom. Add the butter, and cook for 3 minutes longer. Serve immediately.
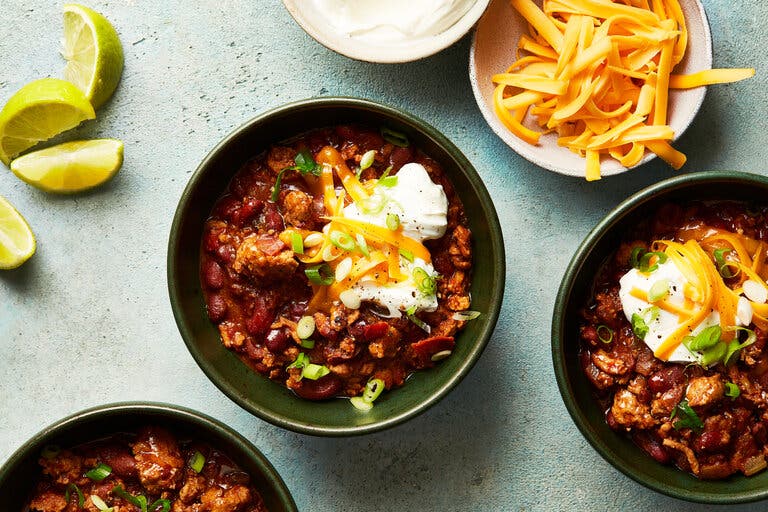
I wanted to publish my meat chili recipe, but this appeared in the NYT, and its so close to mine, that I will give you the alternate ingredients. You can also turn this into a chicken chili recipe if you use white and dark meat ground chicken and canned while beans. Recipe adjustments will follow.
INGREDIENTS
Yield:About 6 servings
1 -2 tablespoons olive oil
2 pounds ground turkey, white and dark meat combined (or 1/2 pound 80% ground beef; 1/2 pound ground pork). If you are making turkey chili, I suggest using only one pound of mixed ground turkey and one cup of broth.
1 large sweet red pepper, cored, deveined and coarsely chopped (green for meat chili)
1 cup chopped celery
1 jalapeño, cored, deveined and finely chopped ( can use 1-2 tablespoons fresh chopped ginger instead)
1 tablespoon fresh oregano, chopped, or 1 tablespoon dried
2 bay leaves
3 tablespoons chili powder (not necessary for meat chili)
2 teaspoons ground cumin (to taste; may need more)
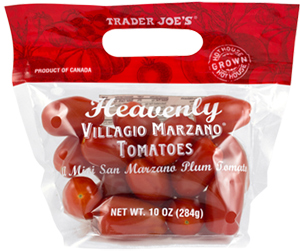
**3 cups canned diced tomatoes (or 1 1/2 packages Trader Joe’s fresh San Marzano tomatoes)** Three cups of caned diced tomatoes will be too much for 1 pound of beef or turkey. Start with 1 1/2 cups, simmer, and then taste. You can always add more.
2 cups chicken broth, fresh or canned (not necessary for meat chili)
Salt and black pepper
2(15-ounce) cans red kidney beans, drained
2 cups shredded Cheddar
1 cup sour cream (optional)
Sliced lime, for garnish
PREPARATION
Heat the oil over high in a large heavy pot and add the turkey meat. Cook until lightly browned, about 5 minutes, chopping down and stirring with the side of a heavy kitchen spoon to break up any lumps.
Add the onions, garlic, sweet pepper, celery, jalapeño, oregano, bay leaves, chili powder and cumin. Stir to blend well. Cook for 5 minutes.
Add the tomatoes, chicken broth, salt and pepper to taste. Bring to a boil, reduce heat and simmer, stirring occasionally, for 15 minutes. Give this about 30 minutes for meat chili.)
Add the drained beans and cook, stirring occasionally, for 10 minutes longer. Serve in bowls with Cheddar, and sour cream and lime wedges, if desired
Definitely add the squeeze of lime juice. Delicious!
Note: In the beginning, I usually add the vegetables in a certain order. First I saute the garlic and ginger for a minute or two being careful not to burn them. Then the chopped onion to soften. Next the celery and peppers, after which I add the ground beef, break up the chunks and cook until no longer pink. Sprinkle in oregano, and add the fresh tomatoes, cut in halves or quarters. Cover and cook for about 15-20 minutes, then add the beans and bay leaf. Add salt and pepper. (If necessary, cook a little longer). Add the cumin to taste at the end. Check for salt and pepper.
For chicken chili, I suggest using one pound of ground chicken and one cup of broth.


:max_bytes(150000):strip_icc()/__opt__aboutcom__coeus__resources__content_migration__serious_eats__seriouseats.com__recipes__images__2015__10__ultra-crispy-roast-potatoes-28189eb8fffd485c9047962b1f9e7606.jpg)
:max_bytes(150000):strip_icc()/__opt__aboutcom__coeus__resources__content_migration__serious_eats__seriouseats.com__images__20111102-ultra-crispy-roast-potatoes-4-46650c7dd69f44cf87884132bf5babc2.jpg)
:max_bytes(150000):strip_icc()/__opt__aboutcom__coeus__resources__content_migration__serious_eats__seriouseats.com__images__20111102-ultra-crispy-roast-potatoes-1-4c1658a178814df8915902a47784099e.jpg)