The Food Lab’s No-Boil Baked Ziti Recipe

BY J. KENJI LÓPEZ-ALT

My daughters made this for a family dinner, and it is the kind of recipe you can easily make for a crowd. They used Rao’s marinara sauce, but if you’re a purist such as me, enclosed you will find a recipe for homemade marinara sauce.

J. Kenji-Lopez suggests soaking the pasta rather than boiling it. “It delivers perfectly al dente baked pasta without the need to use an extra pot or wait for it to boil.

A mixture of a basic marinara sauce with heavy cream and ricotta cheese keeps the pasta moist and flavorful.

Diced cubes of mozzarella form distinct pockets of melted cheese for more textural contrast.”

Ingredients

  • 1 pound (454g) ziti, penne, or other thick tubular pasta
  • 4 cups (950ml) homemade or high-quality store-bought red sauce (such as Rao’s), divided
  • 12 ounces (340g) whole-milk high-quality ricotta cheese 
  • 3 ounces (85g) Parmigiano-Reggiano, finely grated and divided (about 1 1/2 cups)
  • 2 large eggs, beaten
  • 1 cup (240ml) heavy cream
  • 3 tablespoons minced fresh flat-leaf parsley, divided
  • 3 tablespoons minced fresh basil, divided
  • Kosher salt and freshly ground black pepper
  • 1 pound (454g) whole-milk mozzarella cheese, cut into rough 1/4-inch cubes and divided
  • Cooking spray or oil

Directions

  1. Adjust an oven rack to the middle position and preheat the oven to 400°F (200°C). Place ziti in a large bowl and cover with hot salted water by 3 or 4 inches. Let sit at room temperature for 30 minutes, stirring after the first 5 minutes to prevent sticking. Drain.
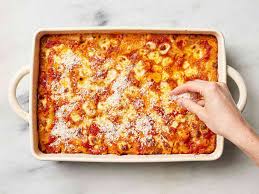
  2. Pour 3 cups of the red sauce into a large pot; add ricotta, half of the Parmigiano, eggs, cream, and half of the parsley and basil, and stir to combine. Season to taste with salt and pepper. Add the soaked ziti along with half of the mozzarella cheese cubes and stir until well combined. Transfer to an ungreased 9- by 13-inch baking dish and top with the remaining 1 cup red sauce and mozzarella.
  3. Lightly grease aluminum foil with cooking spray or oil. Cover the baking dish tightly with the sprayed aluminum foil and bake for 45 minutes. Remove foil and bake until the cheese begins to brown, about 15 minutes longer. Remove from oven and sprinkle with remaining Parmigiano, then let cool for 10 minutes. Sprinkle with remaining parsley and basil and serve.

Notes: Look for a ricotta cheese that contains nothing but milk, salt, and starter culture or acid. Avoid those with gums and stabilizers. Our favorite national store-bought brand is Calabro.

FYI: We finished every last bit!!!

RED SAUCE—tomato sauce flavored with garlic, oregano, and olive oil.

J. Kenji-LOpez: “Marcella Hazan’s recipe for tomato sauce may deliver the most culinary bang for your buck that you’ll ever see. It’s so simple it doesn’t even need a full recipe—just simmer a 28-ounce can of whole tomatoes with five tablespoons of unsalted butter and an onion split in half, crushing the tomatoes against the sides of the pot with a spoon—but the flavor you end up with is rich, fresh, and perfectly balanced. I like to substitute extra-virgin olive oil for half of the butter to bring some extra complexity into the mix.” Then add some sautéed garlic and oregano.

Roasted Butternut Squash and Garlic Soup

 BY ALEXANDRA STAFFORD

Recently I’ve been perusing this website, alexandracooks.com, and found two recipes that I wish to share. Roasted Butternut Squash and Garlic Soup and Vegetable Stock. As I try new recipes that I like, I’ll post them, otherwise definitely look over this site.

INGREDIENTS

1 whole butternut squash, 2.25 to 2.75 lbs

1 whole head/bulb of garlic
extra-virgin olive oil
1 quart of stock of choice, such as vegetable or chicken
kosher salt
3 tablespoons of crème fraîche or heavy cream, optional

Fresh cracked pepper to taste

INSTRUCTIONS

  1. Preheat the oven to 350ºF. Line a sheet pan with parchment paper (for easier cleanup).
  2. Halve the butternut squash: slice off the bottom of the bulbous end, stand the squash upright, then carefully cut straight down through the center. Use a spoon to scoop out the seeds and discard. Rub the halved sides with a drizzle of olive oil then place them halved side down on the prepared sheet pan. Cut the head of garlic in half through the equator. Rub a small amount of olive oil on the sheet pan and place the garlic, cut side down, in the olive oil. Transfer to the oven.
  3. After 40 minutes, check on the garlic. If it is knife-tender and caramelized at the surface, remove it, otherwise, let it continue roasting with the squash until done. Cook the squash for roughly 1 hour or until knife tender at the solid end
  4.  Let the squash and garlic cool for 20 minutes or until cool to the touch. Scoop the squash flesh into a pot. Squeeze the roasted cloves of garlic into the pot as well. Add the quart of stock. Bring to a simmer.
  5. Use an immersion blender to purée the mixture — alternatively, transfer the mixture to a blender or food processor and purée until smooth. If you transferred the mixture to puree it, return it to the pot and bring it to a simmer. Taste. Adjust salt and pepper. I consistently add 1 to 1.5 teaspoons of Diamond Crystal kosher salt. 
  6. If you wish, add the heavy cream or crème fraîche and whisk to incorporate. Depending on the size of the squash, you may need to add more stock to thin it to the right consistency. 
  7.  You could top the soup with frizzled sage leaves and olive oil-toasted bread…

The garlic should be caramelized at the edges and knife-tender as well… some of these are overdone.

Frizzled sage leaves

Ingredients

  • Whole sage leaves, as many as you like
  • Extra-virgin olive oil, enough to coat entire bottom of skillet
  • Kosher salt, for sprinkling
Instructions

Repeat in batches until all sage leaves are fried.

Coat the bottom of a skillet with extra-virgin olive oil, heat until shimmering then add sage leaves in a single layer. Watch them closely as it only takes about 30 seconds or so for them to crisp up, then remove them with a slotted spoon. Put them on a plate lined with paper towels then transfer them to a serving plate. Sprinkle immediately with salt to taste. 

Homemade Vegetable Stock
INGREDIENTS

  • 1 large yellow onion, quartered through the root
  • 2 large carrots, roughly chopped
  • 1 stalk celery, roughly chopped
  • 1 large leek, washed and roughly chopped, optional
  • 3 cloves garlic, peeled and crushed with the back of your knife
  • 4 sprigs fresh parsley
  • 4 sprigs fresh thyme
  • 1 bay leaf
  • 1 teaspoon coarse salt
  • 1 teaspoon black peppercorns
  • 3 quarts cold water
INSTRUCTIONS

Combine everything in a pot. Bring to a boil, lower the heat, and simmer for 45 minutes.

Let stock cool and strain into clean containers,

Store stock in the refrigerator for 1-2 weeks or in in the freezer for up to 6 months.

Pumpkin Crumb Cake

By Yossy Arefi

This is a lovely way to use up some of that Halloween pumpkin. Just bake a piece of it, and use the scooped out flesh. Sorry, I didn’t add the glaze, but it was delicious without it. The glaze, however, will give the cake “an extra hint of sweetness and spice,” along with a more festive presentation.

Included is a homemade recipe for pumpkin spice blend. If you have those spices on hand, definitely make it.

Yield: 1 (8-inch-square or 9-inch-round) cake

INGREDIENTS FOR THE STREUSEL:

½ (packed) cup/100 grams light brown sugar

½ cup/64 grams all-purpose flour

1 teaspoon store-bought or homemade pumpkin spice blend (see Tip)

Pinch of salt

¼ cup/56 grams unsalted butter, cold and cut into cubes

FOR THE PUMPKIN CAKE:

1 (packed) cup/200 grams light brown sugar

2 large eggs

1 cup/230 grams canned pumpkin purée

¼ cup/56 grams unsalted butter, melted

1/4 cup neutral oil

1 tablespoon store-bought or homemade pumpkin spice blend (see Tip)

½ teaspoon fine sea salt

1 teaspoon baking powder

½ teaspoon baking soda

1 ½ cups/190 grams all-purpose flour

FOR THE GLAZE:

  • ¾ cup/75 grams confectioners’ sugar
  • ¾ teaspoon pumpkin spice blend
  • Pinch of salt
  • 3 to 5 teaspoons milk (any kind will do)
  • TIP
  • Make your own pumpkin spice blend by combining 2 tablespoons ground cinnamon, 1 tablespoon ground ginger, 1 teaspoon freshly grated nutmeg, 1 teaspoon ground cardamom, ½ teaspoon ground allspice and ¼ teaspoon ground cloves. Makes about ¼ cup.
PREPARATION:
  1. Place a rack in the center of the oven and heat oven to 350 degrees. Spray an 8-inch square or 9-inch round baking pan with cooking spray and line with parchment paper. ( I prefer using softened butter to grease the pan and then sprinkling sugar on all sides, instead of the parchment. Didn’t make cake too sweet.)
  2. Make the streusel: In a small bowl, combine the sugar, flour, pumpkin spice and salt. Add the butter, then pinch the butter into the flour mixture with your fingertips until the mixture forms pebble-size crumbs and is evenly moistened.
  3. Make the cake: In a large bowl, whisk the sugar and eggs until pale and foamy, about 1 minute. Add the pumpkin purée, melted butter, oil, pumpkin spice and salt; whisk until combined and smooth. Whisk in the baking powder and baking soda, then whisk in the flour.
  4. Transfer the batter to the prepared pan, smooth the top and tap on the counter a few times to release any large air bubbles. Sprinkle the streusel evenly over the top.(It’s not too much streusel!)
  5. Bake the cake until puffed and golden, and a toothpick inserted into the center comes out clean, 40 to 45 minutes. Set the cake in the pan on a rack to cool. After about 15 minutes remove the cake from the pan and set it on the rack to cool almost completely. When the cake is just slightly warm, make the glaze, if using: Add the confectioners’ sugar, pumpkin spice, pinch of salt and 3 teaspoons of milk to a bowl. Whisk until smooth, adding a bit more milk as necessary to form a glaze that is very thick but can be drizzled.
  6. Drizzle the glaze over the top of the cake.

One-Bowl Lemon-Blueberry Quick Bread

Alexandra Stafford

This is a one bowl and baked in a loaf pan “quick bread” that comes together in no time, and according to the author, thanks to both olive oil and yogurt, it stays exceptionally moist for days. The only difficult part for me was the zesting of the lemons. I never seem to get enough zest. Thankfully, my son, Adam, lent a hand. Plenty!

Ingredients:

  • softened butter for the pan
  • zest from 2 lemons
  • 1 cup (200 g) sugar
  • 1/2 cup (118 g) extra-virgin olive oil or vegetable oil
  • 1 teaspoon vanilla extract
  • 2 large eggs
  • 2 tablespoons freshly squeezed lemon juice
  • 1/2 cup (120 g) sour cream or whole milk yogurt
  • 2 teaspoons baking powder
  • 1/2 teaspoon kosher salt
  • 1 1/2 cups (195 g) all-purpose flour
  • 1 1/2 cups (222 g) fresh or frozen blueberries
  • 1 1/2 Tablespoons of turbinado sugar for sprinkling

    INSTRUCTIONS
    Heat the oven to 350ºF. Grease an 8 1/2 – x – 4 1/2-inch loaf pan with softened butter. Line with a sheet of parchment paper that extends up and over the long sides of the pan (like a cradle for your cake).
  • Rub the lemon zest into the granulated sugar with your fingers in a large bowl until fragrant. Whisk in the oil and vanilla for 30 seconds. Whisk in the eggs, one at a time, and then the lemon juice and yogurt. Sprinkle the baking powder and salt into the bowl, one at a time, vigorously whisking after each. Gently fold in the flour just until a few streaks remain. The batter will be slightly lumpy. Fold in 1 cup (145 g) of the berries. 
  • Scrape the batter into the pan, smooth the top, then arrange the remaining 1/2 cup (72 g) of berries over the top of the loaf, pressing down gently. Lightly sprinkle with turbinado sugar and bake for 60 to 70 minutes, rotating at the halfway point. The cake is done when a wooden skewer inserted into the center comes out with a moist crumb or two. Remove from the oven and let cool in the pan for about 20 minutes. Run a knife around the edges, then lift the cake out by the parchment paper overhang and transfer to a rack. Let cool to room temperature before slicing and serving. Keep the cake, wrapped, on the counter for up to 3 days. 
  • It seemed to taste even better the next day !


    4 Stars


    3 Stars


    2 Stars


    1 Star

    Name *
     
    Email *
     
    Website
     

    Email me when Ali replies to my comment

    292 Comments on “One-Bowl Lemon-Blueberry Quick Bread”
    AMBER SOURS — REPLY
    I would give this recipe a five star rating. I decided to go ahead and make it last night after reading all the comments with their positive reviews. I did make a few alterations and I put mine in a bread machine. Instead of sour cream I used vanilla bean Greek style yogurt. At the end of the recipe I added a half a cup of vanilla granola and sliced almonds. I also added three tablespoons of honey. I put it all in the bread maker turned it on the quick bread setting and went to bed myself. This morning it was glorious. I would love to include a picture, however it didn’t make it past breakfast. It was dense and moist and flavorful and the Granola and the almonds gave it just a bit of texture. Thank you very much!


    ALEXANDRA STAFFORD — REPLY
    Wow, so interesting to read all of this! I had no idea bread machines had quick bread settings. Thanks for writing and sharing these notes 🙂 🙂 🙂
    DEE — REPLY
    Please mention coating the blueberry’s in flour if they are frozen.  I didn’t do that step and all the berries sunk to the bottom and it was mushy. Such a. Disappointment 


    CATHEE BRESNAHAN — REPLY
    I was worried about not coating the frozen blueberries with flour, but thought I would try it. I carefully added 1 cup of frozen blueberries and gently stirred just to coat. Then I added the 1/2 cup to the top and gently pushed them down. It baked just as her picture. However, using my confection oven, I had to bake for 75 min. (covering the end pieces with foil for the last 15 min.. I did make a lemon glaze for the top using powder sugar and the remaining lemon juice I had left over.


    ALEXANDRA STAFFORD — REPLY
    Thanks so much for sharing all of these notes, Cathee! So helpful 🙂
    EMMY — REPLY
    I doubled the recipe and made two loaves of this last night. I took one to church today for our Easter brunch, and it was gone in 10 minutes! I opted for sour cream and veggie oil and it was perfectly moist. I would suggest that if you’re baking two loaves at a time to bake for 70 min and then add time if needed. I did 60 min and the middle was still a little underbaked but another 10-12 minutes was perfect.
    I will be adding this to the regular rotation of quick breads! Thank you!


    ALEXANDRA STAFFORD — REPLY
    Great to hear, Emmy! Thanks so much for writing and sharing your notes 🙂 🙂 🙂
    LINDA — REPLY
    Delicious and I’ll definitely be making this again. Thank you for the recipe.


    ALEXANDRA STAFFORD — REPLY
    Great to hear, Linda! Thanks for writing 🙂
    DONNA — REPLY
    Just wondering, due to the giant rhubarb bush I have in my garden, could I substitute that for the berries?? I’m liking the one bowl idea. Thanks.
    ALEXANDRA STAFFORD — REPLY
    I think it should be fine! I had rhubarb scones recently and they were delicious and the woman had simply chopped up the rhubarb and added them to her favorite scone recipe. I say go for it!
    REBECCA — REPLY
    This is one of my favorites! I’ve made in a loaf pan and also mini muffins. Every time this comes out delicious.


    ALEXANDRA STAFFORD — REPLY
    Great to hear Rebecca! Thanks so much for writing 🙂
    DEBORAH — REPLY
    Because the weather is cold and rainy I decided to gat baking and  just made this cake and it’s so delicious. It has the right amount of sugar, vanilla and berries. I had some blackberries so I combined them with the blueberries. Brilliant! My husband saw the cake leave the oven and was extremely disappointed that he had to wait 20 minutes for a slice. It was worth the wait! Then there was no risk of breaking the cake. It’s the only cake where my husband and I have had 2 pieces each within an hour. So good! And so easy to throw together. Thanks for the changes you made to the original recipe Ali


    ALEXANDRA STAFFORD — REPLY
    So great to read all of this, Deborah! It is SO hard to wait those 20 minutes… sometimes I need to leave the house to pass the time. Thanks for writing! xoxo
    BELINDA HART — REPLY
    Great recipe! I made it gluten free and half monk fruit sweetener and it came out terrifically! It’s light and fluffy and full of lemon flavor just as I like it. I put a lemon glaze on it too. I will be making this many times. Thank you!


    ALEXANDRA STAFFORD — REPLY
    Great to hear! Thanks so much for writing and sharing these notes 🙂
    ROSI — REPLY
    I made this today and it’s delicious, however it comes to  very high in the center. What did I do wrong?


    ALEXANDRA STAFFORD — REPLY
    Hi! Can you clarify your question? I’m no sure what the problem is 🙂
    BONNIE — REPLY
    Very good and moist!  I made a lemon glaze rather than sprinkling with sugar.


    ALEXANDRA STAFFORD — REPLY
    Yum!
    DONNA H — REPLY
    I did both!! Lol
    DONNA H — REPLY
    5star recipe! Just like the peasant bread is 5 stars. 
    This blueberry lemony delight is bakery quality. Not just any bakery but high end extraordinary bakery. It is stupendous. And easy to make. Rubbing the lemon zest into the sugar is brilliant. It’s delicious. 


    LILI — REPLY
    Thanks for sharing your recipe.  It was very lemony and moist but I felt the extra virgin oil was too overpowering.  I will make it again using vegetable oil 😉


    LILI — REPLY
    Thanks for sharing your recipe.  It was very lemony and moist but I felt the extra virgin oil was too overpowering.  I will make it again using vegetable oil 🙂


    MARY — REPLY
    I wonder how I would alter cooking time & temp to make 4 mini loaves?
    Love this recipe!!!


    ALEXANDRA STAFFORD — REPLY
    Same temperature! The timing will depend on the size of your mini loaves, but I would start checking after 30 minutes 🙂
    KYONG — REPLY
    this looks so delish! i wonder if i could add some leftover sourdough discard, like about 100g. if so, what would be the adjusted plain flour measurement? thank you for this recipe!
    ALEXANDRA STAFFORD — REPLY
    Worth a shot! I’d reduce the flour by 50 grams.
    NIKI MALLETT — REPLY
    One of my favorite flavor, combinations, blueberries and lemons… This is my all-time favorite quick bread recipe. I always end up putting in more blueberries(and lemon zest) cause I can’t help myself 🫣it just takes a bit longer to bake!  I also put the turbinado sugar on the parchment paper after buttering the pan… Makes the whole darn thing like crystallized deliciousness…🤤 ( started doing this years ago with my banana bread and it carries through) . Big chunk of this with a cappuccino for breakfast and I am powered through my morning!  Amazing!  Your recipes never disappoint! Working my way through your Crumbs cookbook…  Appreciate all the effort you put into it. Pictures are stunning. The recipes are delightful. I pass them on all the time to my family members 🫶🏼 


    ALEXANDRA STAFFORD — REPLY
    Awww Niki, it’s so nice to read all of this… thank you for your kind words 🙂 Turbinado-encrusted banana bread sounds absolutely divine!
    CATHY — REPLY
    Love that it is one bowl and so easy. Just took it out of the oven and it looks so perfect ,I can’t believe I made it! Only had one lemon but it provided 2 Tbsp of juice so should do. I’m going to try scones next as the blueberries are so abundant now. Thankyou Ali.


    ALEXANDRA STAFFORD — REPLY
    Great to hear, Cathy! And I hear you: can’t get enough of blueberry everything right now 🙂
    GAYLE BENDECK — REPLY
    I’ve made this loaf many times and it is always delicious! I was wondering if it can be frozen?


    ALEXANDRA STAFFORD — REPLY
    Great to hear, Gayle! And yes, it can 🙂
    SANDY — REPLY
    I love this blueberry sour cream bread! I cut the sugar to 3/4 cup and the oil to 1/4 c. avocado oil plus 1/4 c. buttermilk. It came out absolutely delicious! My husband thought it was delicious too! Thank you for the recipe.
    I also made your one-bowl blueberry scone recipe, They are baking as we speak!!


    ALEXANDRA STAFFORD — REPLY
    So nice to read all of this Sandy! It’s hard not to make blueberry everything this time of year. Thanks for writing!
    JACK — REPLY
    I made 6 jumbo muffins out of the batter. I subbed with avocado oil, 1 huge lemon and a scant 1/3 cup of Splenda’s baking mix sweetner. I also reduced the AP flour to 1 cup and added 1/2 cup almond flour. Baked for 40 minutes. Very moist and delicious and not too sweet. A keeper!


    ALEXANDRA STAFFORD — REPLY
    Great to hear Jack! Thanks for writing and sharing these notes 🙂
    KATHLEEN ALLEN — REPLY
    Hi Ali:
    This bread was fun to make. I followed your ingredients and instructions to a “t” and it came out beautifully and delicious. I used frozen blueberries without flour. I baked it about 70 minutes. I used sparkling sugar on top of the blueberries. I will certainly make this recipe again. Thanks so much. Kathy


    ALEXANDRA STAFFORD — REPLY
    Great to hear, Kathleen! Thanks for writing and sharing these notes 🙂
    RHONDA E DAVIS — REPLY
    Deliciously successful! Macerating the lemon zest sent a burst of lemon flavor and scent throughout the batter, my kitchen, and infused the finished cake with a delightfully fresh flavor I used fresh blueberries very lightly dusted with a bit of flour. I didn’t have turbinado sugar, so added scant 1/4 tsps cinnamon and nutmeg to mix and sprinkled the batter with some finishing sugar (larger sugar crystals) before baking. Quick mix, easy cleanup and fabulously moist, flavorful cake makes this a repeatable recipe. Thank you so very much.
    ALEXANDRA STAFFORD — REPLY
    Great to hear, Rhonda! Thanks for writing and sharing all of these notes 🙂 All sounds delicious!
    SANDRA MCDONALD — REPLY
    We do not have kosher salt here in New Zealand, would our iodised salt be a good subsistute, or freshly ground sea salt?
    ALEXANDRA STAFFORD — REPLY
    Hi! I think sea salt would be best 🙂
    DOROTHY — REPLY
    Hmm, I cook this for an hour and it was sitill raw. Should I be using convection?
    ALEXANDRA STAFFORD — REPLY
    Hmmmm…. I don’t use convection but you could try that next time. Does your oven run cool?
    LUCILLE SMITH — REPLY
    The easiest and most delicious cake!!! You must try this. I did add extra zest which made it oh so lemony. Yummy


    ALEXANDRA STAFFORD — REPLY
    Great to hear, Lucille! Thanks so much for writing. I’m always down for more lemon zest 🙂
    DEE — REPLY
    I didn’t have parchment paper, turbinado sugar, or plain yogurt. I doubled the recipe, as it was for a bake sale fund raiser for my church. I used sanding sugar and I used Vanilla Greek Yogurt. It turned out very moist and tasty.


    ALEXANDRA STAFFORD — REPLY
    Great to hear, Dee! Thanks for writing and sharing your notes 🙂
    JEN — REPLY
    This cake is unreal. It’s Perfect with coffee, for guests or just a little treat for yourself. I made this on a beach holiday and the wonderful smells filled the house, gently waking everyone up. Once everyone descended on the kitchen, it was gone! Make this today!


    ALEXANDRA STAFFORD — REPLY
    So nice to hear this, Jen! Thanks so much for writing 🙂
    More Comments:
    « PREVIOUS 1 … 3 4 5

    Hi, I’m Ali!
    Bread enthusiast. Vegetable lover. Omnivore. 
    MORE ABOUT ME »

    Order Now!
    ORDER YOURS TODAY »

    Bread Toast Crumbs
    Recipes for no-knead loaves and meals to savor every slice.
    BUY NOW »
    Find the Perfect Recipe:


    OR BROWSE THE RECIPE INDEX »
    First time visiting? START HERE »
    Vegetarian Recipes


    MORE VEGETARIAN RECIPES 
        
    Pizza Perfected
    7 SECRETS TO MASTERING PIZZA AT HOME


    SUBSCRIBE »

    The Best Lemon-Blueberry Muffins

    58.6k

    Fresh Lemon-Blueberry Dutch Baby

    37.3k

    Fresh Lemon-Blueberry Scones

    8,999


Shrimp with Lobster Sauce

by Kristina Cho

Shrimp with lobster sauce is a beloved Cantonese favorite, but it doesn’t have any actual lobster in it. The sauce, which is a glossy, savory sauce with ribbons of egg and thickened with cornstarch, gets its name from being traditionally served with stir-fried lobster. 

I made this dish for a weeknight dinner and was pleasantly surprised. It really tasted authentic!

The author suggests not to over mix the eggs. “I think the dish looks best with bigger curdles of egg, so avoid over mixing and allow the eggs to set up in the sauce before stirring.”

Swap out for broth. One cup of chicken broth can be substituted for the water and chicken bouillon powder in the sauce.

INGREDIENTS

  • 1 pound raw peeled and cleaned shrimp (extra-jumbo, 16 to 20 per pound)
  • 2 cloves garlic
  • 1 (1-inch) piece ginger
  • 3 medium scallions, plus more for garnish
  • 2 large eggs
  • 1 cup water
  • 1 tablespoon cornstarch
  • 2 teaspoons chicken bouillon powder, such as Lee Kum Kee or Knorr
  • 1 teaspoon toasted sesame oil (I used a tablespoon.)
  • 2 teaspoons oyster sauce (bought in an Asian market)
  • 1/2 teaspoon ground white pepper
  • 1/2 teaspoon granulated sugar (tastes a little sweet but adding salt to taste should balance that out)
  • 2 tablespoons avocado or olive oil
  • Kosher salt
  • Steamed white rice, for serving
  • INSTRUCTIONS
  • Peel and clean 1 pound raw extra-jumbo shrimp if needed and pat dry with paper towels. Mince 2 garlic cloves. Peel and finely chop a 1-inch piece of ginger (about 1 tablespoon). Place the garlic and ginger in a small bowl. Thinly slice 3 medium scallions (about 1 cup), plus more for garnish.
  • Place 2 large eggs in a small bowl and whisk until smooth.
  • Place 1 cup water, 1 tablespoon cornstarch, 2 teaspoons chicken bouillon powder, 1 teaspoon toasted sesame oil, 2 teaspoons oyster sauce, 1/2 teaspoon ground white pepper, and 1/2 teaspoon granulated sugar in a medium bowl or liquid measuring cup and whisk to combine.
  • Heat 2 tablespoons avocado or olive oil over medium-high heat in a large frying pan until shimmering. Add the shrimp in a single layer and sear until golden-brown on the bottom and on the edges, 2 to 3 minutes. Flip the shrimp and sear until the second side is golden-brown and the shrimp are starting to turn pink. Add the garlic and ginger and cook, stirring often, until the garlic and ginger are just starting to brown, about 1 minute. (I prefer shrimp more well done.)
  • Reduce the heat to medium. Give the sauce mixture another quick whisk (the cornstarch tends to settle at the bottom). Pour into the pan and bring to a simmer. Constantly stir until the sauce thickens and is glossy, 1 to 2 minutes. Add the scallions and stir to combine.
  • Drizzle the eggs all over the sauce in a thin stream. Let cook undisturbed until the eggs are set, about 30 seconds. Gently stir to create curdles of egg.
  • Remove the pan from the heat and let cool for a few minutes. Taste and season with kosher salt as needed. Garnish with more scallions and serve with freshly steamed rice.

Crunchy Noodle Kugel à la Great-Aunt Martha

By Melissa Clark

“The genius of this sweet noodle kugel — the rich, custardy casserole that is a staple of Jewish cooking — is that its top is designed to offer maximum crunch while its interior remains creamy and luscious. The secret: use a jellyroll pan…”

I have not made a noodle kugel in at least 20 years, but when I saw this recipe, it renewed my interest. The only addition I would add would be to grate a large, peeled apple into the casserole. There is no need to use a jelly roll pan for extra crunch, as suggested. An oblong, glass Pyrex baking dish will do nicely.

INGREDIENTS

Yield: 8 to 12 servings

  • 1 cup raisins
  • Sherry or orange juice
  • 1 pound egg noodles
  • 6 tablespoons unsalted butter, cut into pieces, more for pan
  • 4 large eggs
  • 3 cups cottage cheese
  • 1 cup sour cream
  • ⅓ cup sugar
  • 1 teaspoon ground cinnamon
  • Grated zest of 1 lemon
  • Pinch of salt

PREPARATION

  1. Put raisins in a microwave-safe bowl or small saucepan and cover with sherry or orange juice. Heat on stove top or in microwave oven until liquid is steaming hot (about 1½ minutes in microwave or 3 minutes on stove). Let cool while you prepare kugel mixture.
  2. Preheat oven to 400 degrees. Butter an 11-by-17-inch jellyroll pan. Cook noodles according to package directions and drain well. Immediately return noodles to pot and add butter. Toss until butter melts.
  3. In a large bowl, whisk together the eggs, cottage cheese, sour cream, sugar, cinnamon, lemon zest and salt. Drain raisins and add to bowl along with buttered noodles. Mix well.
  4. Spread mixture in prepared pan and smooth top. Bake until top is crusty and golden, 25 to 35 minutes. Serve warm or at room temperature. (It might take a little longer to bake.)

Note: I soaked the raisins in orange juice. This added a nice flavor to the pudding.

Chicken Francese

By Julia Moskin

Rating4(6,962)NotesRead community notes

Chicken francese, sometimes called chicken French, is one of those rare restaurant dishes that’s truly easy to cook at home. If you can make chicken cutlets, you can make this lemony, buttery recipe; the only difference is an easy pan sauce that brightens the whole plate. This version includes lemon slices browned in butter, which are pretty and tasty but entirely optional.

INGREDIENTS:

Yield: 4 servings

  • 2 eggs
  • 2 tablespoons whole milk
  • 1 teaspoon salt, plus more for seasoning
  • ½ teaspoon ground black pepper, plus more for seasoning
  • 1 cup all-purpose flour
  • ⅓ cup olive oil
  • ⅓ cup vegetable oil
  • 4 to 6 large boneless, skinless chicken cutlets (buy the cutlets thinly sliced, or buy regular boneless breasts and slice them in half horizontally to make thin pieces)
  • 3 to 6 tablespoons unsalted butter
  • 1 lemon, thinly sliced, seeds removed (optional)
  • ½ cup dry white wine
  • Freshly squeezed juice of 1 lemon, more to taste
  • 2 cups chicken stock
  • 3 to 4 tablespoons freshly minced parsley
PREPARATION:
  1. In a wide, shallow bowl, whisk eggs, milk, salt and pepper until blended. Place the flour in a separate bowl. Line a baking sheet with paper towels.
  2. In a wide skillet, heat olive and vegetable oils over medium heat until shimmering.
  3. Working in batches to avoid crowding the pan, lightly dredge the chicken in flour and shake off any excess. Dip into egg batter, let excess batter drip back into the bowl and place in the skillet. Fry, turning once, until golden brown on both sides, about 4 minutes per side. Adjust the heat as the cutlets cook so they brown slowly and evenly, with a steady bubbling. Transfer to the paper-towel-lined pan and repeat with remaining cutlets.
  4. When all cutlets are browned, remove the pan from the heat and pour off the oil. Wipe out the pan with paper towels. Return the pan to low heat.
  5. If making the lemon slices (if not, skip to Step 6 below): Melt 3 tablespoons of the butter and then scatter the lemon slices over the bottom of the pan. Cook, stirring gently occasionally, until the lemon slices are golden and browning around the edges, about 3 minutes. Scoop out the lemon slices and set them aside.
  6. Add 3 tablespoons of butter, the wine and lemon juice and bring to a boil. Boil until the liquid is syrupy, 3 to 4 minutes. Pour in the stock, bring to a boil and cook until thickened into a sauce, about 5 minutes. (It will thicken more when you add the cutlets.) Taste and adjust the seasonings with lemon, salt and pepper; it should be quite lemony and not too salty.
  7. Reduce the heat, tuck the cutlets into the pan and simmer very gently until the sauce is velvety and the chicken pieces are heated through, about 4 minutes. Turn the cutlets over occasionally in the sauce. Place the browned lemon slices on top. Sprinkle with chopped parsley and serve, spooning some of the sauce over each serving.

Note: I made enough chicken for two dinners. The first night, I soaked the cutlets in a brine of salt water for about one hour. After rinsing them off well, I dredged them in flour and then dipped them in the egg batter. Once they were ready, we ate them with a good squeeze of fresh lemon juice. They didn’t need additional salt. The second night, I had more time and made the sauce. Both ways were delicious.

Your brine should resemble sea water.

Gochujang Buttered Noodles

By Eric Kim: This recipe is from a NYT article, Our 50 Greatest Hits, According to You.

Eric Kim slips a quarter-cup of fiery gochujang paste into a butter-garlic sauce to make this simple, six-ingredient dish, which has quickly risen through the ranks of Cooking favorites. A dose of honey and sherry vinegar balance the heat so you’re left with a dinner that’s sweet, spicy and just a little tangy.

NOTE: This is a delicious recipe, especially if you enjoy spicy food. I made the single serving suggestion, but it was still too spicy for me. When I make it again, I will use a teaspoon instead of a tablespoon of gochujang. The noodles don’t need much salt; I only added some to the pasta water.

INGREDIENTS

Yield: 4 servings

  • 1 pound spaghetti or other long pasta
  • 6 tablespoons unsalted butter
  • 12 garlic cloves, finely chopped (about ⅓ cup)
  • Salt and pepper
  • ¼ cup gochujang paste (not sauce)
  • ¼ cup honey
  • ¼ cup sherry vinegar or rice vinegar
  • Finely chopped cilantro or thinly sliced scallions (optional)

PREPARATION:

  1. Bring a large pot of water to a boil. Add the spaghetti and cook according to package instructions. Reserve 1 cup of the cooking water. Drain the spaghetti and return to its pot.
  2. While the pasta cooks, melt 4 tablespoons of the butter in a skillet over medium-low. Add the garlic and season generously with salt. Cook, stirring occasionally, until the garlic starts to soften but not brown, 1 to 3 minutes.
  3. Stir in the gochujang, honey and vinegar, and bring to a simmer over medium-high. Cook, stirring constantly, until the mixture reduces significantly, 3 to 4 minutes; when you drag a spatula across the bottom of the pan, it should leave behind a trail that stays put for about 3 seconds. Remove from the heat.
  4. Transfer the sauce to the pot with the spaghetti and add the remaining 2 tablespoons butter. Vigorously stir until the butter melts. Add splashes of the pasta cooking water, as needed, to thin out the sauce. Taste and season with salt and pepper (pepper not necessary). Top with the cilantro or scallions (if using) and serve immediately.

TIPS

  • Be sure to purchase plain gochujang paste, not gochujang sauce, which often includes additives like vinegar and sugar. To easily measure out gochujang, swipe the inside of a measuring cup with a little neutral oil, which will get it to slip right out.
  • To make a single serving, follow the recipe using 4 to 5 ounces fresh or instant ramen noodles; 1½ tablespoons unsalted butter (1 tablespoon to fry the garlic and ½ tablespoon for the sauce at the end); 3 garlic cloves; 1 heaping tablespoon gochujang; 1 tablespoon honey; 1 tablespoon sherry vinegar or rice vinegar. Decrease the cook times throughout by 1 to 2 minutes

This can be found in an Asian market. Buy the smallest amount you can.

Zula Grill and Veselka

I have two new restaurants to recommend. The first, a kosher Israeli restaurant, Zula Grill, is in Englewood, New Jersey. Best to go with a group so you can sample many of their delicious options like their Salatim Sampler,
a bit of all the staple dips and salads that compose an Israeli dinner table. My personal favorites are: Babaganoush, roasted eggplant and tahina dip, Matbucha, Moroccan stewed tomato dip, the Classic Chickpea hummus with warm chickpeas and lemon, an Israeli salad, and the best ever Falafel with tahina sauce, all served with traditional pita bread baked in house. Of course they have a full menu which includes lamb, chicken, beef and fish and a Kids’ Meal section. And, not to miss in Englewood is ShopRite, a mega supermarket right down the street. Excellent prices, a huge selection of groceries, and if you spend $100 and have a New York license, they will give you $6.00 back towards your toll.

The second is Veselka, a Ukrainian diner’s newest location in Williamsburg, Brooklyn. My son and I went for brunch and really over ordered, wanting to try so much of their menu.

Their potato pancakes are quite good, served with sour cream and applesauce. They are large, crispy and fluffy – not like homemade- but enjoyable. I wanted to try their pierogis -Adam liked them, but I thought their “skin” was too thick. What we loved on this visit was their Ukrainian Borscht (beet soup), pickled red onions and cucumbers, their side of beets mixed with horseradish, and their blintzes, Ukrainian-style crepes filled with lightly sweetened farmer’s cheese and raspberry sauce. We want to return to try some of their classics such as: Beef Stroganoff, Veal Goulash, Chicken Paprikash, Ukrainian Meatballs, and of course, another order of blintzes.

Quick Pickled Red Onion

By Naz Deravian
Quick Pickled Red Onion

Pickled red onion livens up a wide array of dishes, providing a bright crunch and a festive fuchsia hue. The bite of the onion itself is tempered in a sweet, salty and sour brine. Choose from a variety of vinegars, depending on what’s in the pantry, including white, red or apple cider vinegar. For extra flavor, feel free to add a couple of garlic cloves, mustard seeds, allspice berries or coriander seeds to the brine. The pickled onion can be used right away or stored in the fridge for up to 1 week; their flavor will develop the longer they sit. Use them as a topping for any number of dishes, including saladssoupseggs and burgers

INGREDIENTS

Yield: 2 cups (with pickling liquid)

  • 1 large red onion
  • 2 teaspoons kosher salt (such as Diamond Crystal)
  • 2 teaspoons granulated sugar
  • ¾ cup vinegar (white or red wine, distilled or apple cider)

PREPARATION

  1. Thinly slice the red onion by halving through the root and slicing in the same direction. Separate the slices by hand, as best you can, without getting too obsessive. Place the onion slices in a heat-proof, wide-mouth jar or container (about 1 pint capacity). It might seem like they won’t fit, but the onion slices will shrink as they pickle.
  2. Add the salt, sugar, vinegar and ¼ cup water to a small saucepan. Heat over medium-high, stirring to dissolve the salt and sugar. As soon as the mixture comes to a boil, remove from the heat and pour half of the liquid over the onion, pressing down the slices with the back of a spoon. Add the remaining liquid, continuing to press down the slices.
  3. Cover and give the jar a gentle shake. Set aside to pickle for about 30 minutes. Serve right away, or cool to room temperature and place in the fridge in the pickling liquid, covered, for up to 1 week.

From Debbie J, thank you. An alternative recipe:

1 cup white vinegar, 3/4 cup sugar, 1/2 cup water

Melt ingredients on stove and then keep in refrigerator. Cut up cucumbers, peppers and red onion. Put a good amount of dressing on them, add salt and pepper, and some feta cheese. Dress your salad 1/2 hour before you eat.

Note: I have been eating these pickled onions all week – on everything! It must be my Russian ancestry, speaking of which I want to recommend a terrific book if you haven’t already read it, A Gentleman in Moscow, by Amor Towles. It’s about a count, who after the  Bolshevik revolution of 1917, is placed under house arrest at his current residence, the Hotel Metropol in central Moscow. It is also a British television limited series consisting of eight episodes. Not to miss!