Marcella Hazan’s Bolognese Sauce

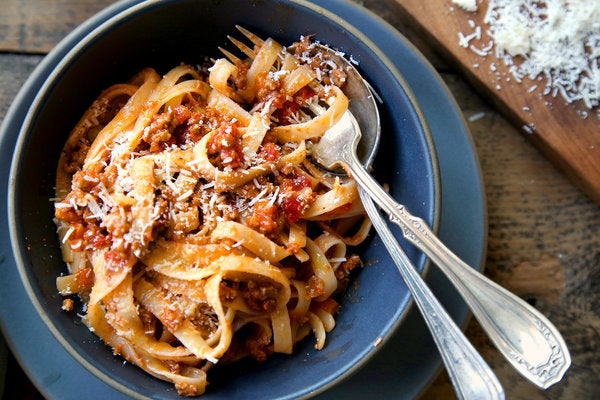
Recipe from Marcella Hazan Adapted by The New York Times

This is a really delicious recipe. I used 1/2 cup of wine instead of a full cup, but that’s up to you, and also a combination of beef and pork.

INGREDIENTS

Yield: 2 heaping cups, for about 6 servings and 1½ pounds pasta

  • 1 tablespoon vegetable oil
  • 3 tablespoons butter plus 1 tablespoon for tossing the pasta
  • ½ cup chopped onion
  • ⅔ cup chopped celery
  • ⅔ cup chopped carrot
  • ¾ pound ground beef chuck (or you can use 1 part pork to 2 parts beef)
  • Salt
  • Black pepper, ground fresh from the mill
  • 1 cup whole milk
  • Whole nutmeg
  • 1 cup dry white wine
  • 1½ cups canned imported Italian plum tomatoes, cut up, with their juice
  • 1¼ to 1½ pounds pasta
  • Freshly grated parmigiano-reggiano cheese at the tab

PREPARATION

  1. Put the oil, butter and chopped onion in the pot and turn the heat on to medium. Cook and stir the onion until it has become translucent, then add the chopped celery and carrot. Cook for about 2 minutes, stirring vegetables to coat them well.
  2. Add ground beef, a large pinch of salt and a few grindings of pepper. Crumble the meat with a fork, stir well and cook until the beef has lost its raw, red color.
  3. Add milk and let it simmer gently, stirring frequently, until it has bubbled away completely. Add a tiny grating — about ⅛ teaspoon — of nutmeg, and stir ( didn’t use this).
  4. Add the wine, let it simmer until it has evaporated, then add the tomatoes and stir thoroughly to coat all ingredients well. When the tomatoes begin to bubble, turn the heat down so that the sauce cooks at the laziest of simmers, with just an intermittent bubble breaking through to the surface. Cook, uncovered, for 3 hours or more, stirring from time to time. While the sauce is cooking, you are likely to find that it begins to dry out and the fat separates from the meat. To keep it from sticking, add ½ cup of water whenever necessary. At the end, however, no water at all must be left and the fat must separate from the sauce. Taste and correct for salt.
  5. Toss with cooked drained pasta, adding the tablespoon of butter, and serve with freshly grated Parmesan on the side.

K’FAR, Diner, and for my grandson, Farm House Cafe

My family and I visited these restaurants recently, and to the first two, we returned a second time.

The Farmhouse Cafe, a farm to table eatery, is located in Cresskill, NJ. Its a charming wooden structure reminiscent of earlier days and features an all day menu “specializing in home style comfort food, hearty and healthy salads, burgers, sandwiches, soups and stews.” Seven of us went for brunch, and it didn’t disappoint. My grandson was very pleased with the choices on the kids menu and asked me to write about it. So for you, K 🙂

K FAR, “village” in Hebrew, is a bakery and cafe located in the Hoxton hotel in Williamsburg, Brooklyn, just downstairs from their hit restaurant, Laser Wolf. Here, its all about reservations, but we didn’t have one the two times we went. We arrived at 11:00 for brunch and took our chances. The food is excellent – Borekas, flaky and stuffed Israeli pastry, a variety of Jerusalem Bagel sandwiches, Kubaneh Toasts (Enriched Yemenite Sabbath Bread), Salads, & Bowls and Pastries. The soft scrambled eggs were delicious as well as the YEMENITE LATTE (Cardamom, Ginger, Cinnamon). If you can’t get a table, you can order from their full menu and sit in the cafe.

And lastly, DINER, located on the corner of Berry Street and Broadway, Brooklyn, is in a 90 year old Pullman dining car and is committed to serving local, seasonal. and sustainable food. The specials change daily, and for brunch, we have tried their egg sandwich (amazing), biscuits and gravy, a fried fish sandwich, and a pork shoulder sandwich – all wonderful. Their french toast on brioche looks great (next time)!

PS: For those of you who live in NJ, I’d like to recommend Tenafly’s Europe Cafe and Grill. I’ve had lunch there twice and was pleased with their “authentic Turkish cuisine.” Their chicken and lamb “shish” (tender char-grilled cubes of chicken or lamb), served with rice and stewed vegetables, was really good. Their menu features vegetarian selections also.

Salt cod and Potato Purée, Updated

David Lebovitz  My Paris Kitchen

This is an incredibly delicious dish. Brandade de morue – or salt cod and potato purée – is a warm dish of puréed potatoes with de-salted salt cod mixed through with a generous helping of garlic, a few herbs and some cream. It’s served like an appetizer with toast and maybe a green salad. Perfect for the chilly temperatures right now.”

Ingredients:

1 lb salt cod, 2/3 cup olive oil, 6 cloves of garlic peeled and minced, 2 sprigs of thyme, 2 large potatoes (1 1/2 pounds), peeled and cut into small cubes, 3/4 cup heavy cream, 1/2 teaspoon freshly ground black pepper, sea salt or kosher salt (optional), toasted or grilled bread to serve.

Topping:

Toss 2 Tablespoons dried bread crumbs and 2 Tablespoons of grated Parmesan cheese in a small bowl with a small pour of olive oil – just enough to moisten the crumbs.Set aside.

Rinse the excess salt off the pieces of salt cod and submerge in a bowl. of cold water in the refrigerator for 24 hours, changing the water at least 3 times.

Combine the olive oil, garlic and thyme in a small saucepan and heat until the oil just starts to bubble. Turn off the heat, cover, and set aside.

Drain the salt cod and put it and the potatoes in a large pot. Cover with cold water. Bring the water to a boil, decrease to a simmer, and cook for 25 to 30 minutes until the fish and potatoes are tender.

Drain the cod and the potatoes. When cool enough to handle, remove any bones, skin, and tough pieces. Be sure to go through the fish carefully.

Transfer the fish and potatoes to the bowl of a stand mixer fitted with the paddle attachment (or by hand with a potato masher). Do not use a food processor. It will make the brandade gummy. Remove the thyme from the garlic infused oil and scrape the oil, cream , and black pepper into the potatoes. Mix on medium speed until smooth. Taste for salt.

Preheat the oven to 400*F. Butter a baking dish that will hold all the brandade and spread the mixture in it. Sprinkle the topping evenly over the brandade.

Bake for 20 or more minutes until bubbling hot and nicely browned on top.

Note: Set the pan on a baking sheet.

Note: This recipe can be made using a generous amount of unsalted butter instead of olive oil and 1/4 to 1/2 pound of shredded gruyere cheese instead of the heavy cream. Use a fork to make ridges on top of the potatoes. Bake in oven and then broil for a few minutes to brown on top. This tastes even better the second day. Reheat at 350* for 30 to 45 minutes.

Easiest Chicken Noodle Soup

By Alexa Weibel

Since I had plenty of frozen stock, I made this recipe, minus the herbs, but adding the garlic and thin egg noodles. However, this recipe is deceptive. It’s only 30 minutes if you have the stock on hand.

“Sautéing ground chicken in olive oil with garlic, coriander and celery seeds (or fennel seeds and rosemary, or herbes de Provence) creates a deeply complex base. Add the vegetables, then the stock and the noodles for a complete meal that cooks in 30 minutes. You can use egg noodles, cavatelli or alphabet noodles, but you may want to adjust the amount of stock to taste, since they’ll each absorb a different amount of liquid.”

Yield: 4 to 6 servings

  • 5 tablespoons extra-virgin olive oil
  • 1 pound ground chicken
  • Salt and black pepper
  • 4 garlic cloves, roughly chopped
  • 1½ teaspoons ground coriander (optional)
  • ½ teaspoon celery seeds (optional)
  • 2 celery stalks, halved lengthwise, then sliced ½-inch thick
  • 1 large carrot, peeled and cut into ½-inch cubes
  • 1 large shallot, finely chopped
  • 1 tablespoon fresh thyme leaves (or 1 teaspoon dried thyme leaves)
  • 7 to 8 cups chicken stock, plus more as needed
  • 8 ounces dried egg noodles, cavatelli or other small shaped pasta
  • Chopped fresh parsley and dill for garnish

PREPARATION

  1. In a large pot, heat 3 tablespoons oil over medium-high. Add the chicken, season generously with salt and pepper, and cook, breaking up with a wooden spoon, until starting to crumble, about 3 minutes. Add the garlic, coriander and celery seeds (if using), and cook, stirring frequently, until chicken is cooked through, about 2 minutes. Using a slotted spoon, scoop the chicken into a small lidded bowl (to retain moisture); cover and set aside.
  2. Add the celery, carrot, shallot, thyme and the remaining 2 tablespoons oil to the pot, season with salt and pepper, and cook, stirring, until slicked with fat, 3 minutes. Add the stock (7 cups for a stew like soup or up to 8 cups for a brothy soup) and bring to a boil over high.
  3. Add noodles and cook over medium-high until al dente according to package directions. (If the noodles absorb a lot of liquid, add more broth according to taste.) Add the reserved chicken and any accumulated juices and heat until warmed, then season to taste with salt and pepper. Divide among bowls; top with a fistful of torn herbs.
  4. Note: The recipe suggests topping soup with a spoonful of crème fraîche and the torn herbs. I only used the dill and parsley.

Chicken Stock

By Samin Nosrat

Yield: About 6 quarts

  • 4 pounds raw chicken bones (Whole Foods has frozen chicken bones.)
  • 6 quarts water
  • 2 onions, unpeeled, quartered
  • 2 carrots, peeled and halved crosswise
  • 2 celery stalks, halved crosswise
  • 1 teaspoon black peppercorns
  • 2 bay leaves
  • 4 thyme sprigs
  • 5 parsley sprigs (or 10 stems)
  • 1 tablespoon white-wine vinegar

PREPARATION

  1. Put everything but the vinegar in a large stockpot. Bring the stock to a boil over high heat, then turn down to a simmer.Skim off any foam that rises to the surface. Add the vinegar. (It helps draw out nutrients and minerals from the bones into the stock.)
  2. Simmer the stock for 6 to 8 hours, covered, keeping an eye on it to make sure it stays at a simmer.
  3. Strain the stock through a fine-meshed sieve. Let cool.
  4. Scrape the fat that rises to the top. (Save it in the fridge or freezer for matzoh ball soup.) Refrigerate for up to 5 days, or freeze for up to 3 months.

Chili Two Ways

(with and without meat)

VEGETARIAN CHILI
(adapted from the Silver Palate Cookbook)

1 medium size eggplant, unpeeled, cut into ½” cubes
1 tablespoon Kosher salt
1/2 cup olive oil
2 medium yellow onions, diced
4 cloves garlic, chopped
2 green bell peppers, cored, seeded, diced
1 can (28 oz) Italian plum tomatoes OR 1 1/2 lb fresh ripe Italian plum tomatoes, diced (about 6)
2 tablespoons chili powder. *(Add one tablespoon and if needed, the other.)
1 tablespoon ground cumin
1 tablespoon dried oregano
2 teaspoons freshly ground black pepper
1 teaspoon salt
1/2 cup chopped fresh Italian parsley, optional
1 can (15 oz) dark red kidney beans, drained and rinsed
1 can (15 oz) chickpeas, drained and rinsed

Toppings for the chili (cheese, sour cream, corn chips, green onions…whatever you like)

  • Place eggplant in a colander and sprinkle with coarse salt.  Let stand for 30-60 minutes.  Pat dry with paper towels.
  • Heat the olive oil in a large dutch oven (or pot) over medium heat. Add eggplant and sauté until almost tender. Remove eggplant to a bowl or plate.
  • Add onions, garlic, and green peppers to dutch oven/pot and sauté just until softened, about 10 minutes. (You might need to add more olive oil.)
  • Lower the heat to medium-low. Add the cooked eggplant back to the pot as well as the canned tomatoes with liquid or fresh tomatoes, chili powder, cumin, oregano, pepper, salt, and parsley.  Cook uncovered, stirring frequently for 30 minutes.
  • Add the kidney beans, and chickpeas, and cook for another 15 minutes.  The eggplant peel should be tender.
  • Top with your favorite toppings.
  • Note: Add 2 stalks of thinly sliced celery to the vegetable mix. I rarely use chili powder. Instead, try some crushed red pepper flakes, but go slow. Perhaps add 1/2 teaspoon and then more if necessary.

CHILI WITH GROUND BEEF

1 LB of ground beef instead of eggplant, 2 bay leaves. Optional, instead of canned beans: 1 cup of dried red beans, soaked overnight, then cooked until soft.

Sauté all the vegetables first, including celery, then add the beef. When beef is browned, add the tomatoes, lower the heat, and cover for a few minutes until the tomatoes release their juices (if you are using fresh). Uncover, add drained cooked beans, or canned, and bay leaves. Continue as above. Adjust seasoning as necessary.

Note: I like to sauté the onion and garlic first, then add the other veggies.

Blueberry Buckle with Lemon Syrup by

David Lebovitz

“Adapted from Rustic Fruit Desserts by Cory Schreiber and Julie Richardson Adding the lemon syrup is an intriguing idea that was part of the original recipe. It’s tangy but does take some of the spotlight off the berries. If you want to omit it, you might want to increase the amount of cinnamon or nutmeg slightly in the batter to give it a little more pizzazz. Other fruits can be used, such as sliced or diced plums, nectarines or apricots…Raspberries can be used in place of the blueberries, or mixed with them…You can use frozen berries if you’d like. Just don’t defrost them first, since they’d get too juicy. Add them frozen, right to the batter.”

Storage: “The buckle can be kept for up to three days at room temperature, if well-wrapped. It can be frozen for up to two months. Not sure if I would pour the syrup over the buckle if I was planning on freezing it, though. You could defrost and rewarm it in a low oven, wrapped in foil, then add the syrup before you plan to serve it.”

Note: I froze it with the syrup. Not a problem!

Topping

  • 4 tablespoons (55g) unsalted butter, cubed and chilled
  • 1/2 cup (100g) sugar
  • 1/3 cup (45g) flour
  • 1/2 teaspoon ground cinnamon

Batter

  • 6 tablespoons (85g) unsalted butter, at room temperature
  • 1 cup (200g) sugar
  • zest of 2 lemons (use the same lemons for the syrup, below)
  • 1 1/2 cups (230g) + 2 tablespoons flour
  • 1 teaspoon baking powder, preferably aluminum-free
  • 1/4 teaspoon baking soda
  • 1/2 teaspoon salt
  • 1/2 teaspoon ground cinnamon, or 1/4 teaspoon ground nutmeg
  • 2 large eggs, at room temperature
  • 1/2 cup (125ml) buttermilk, at room temperature
  • 3 cups (1 1/2 pints, 475g) blueberries

Lemon Syrup

  • 1/3 cup (65g) sugar
  • juice of 2 medium lemons (about 6 tablespoons, 90ml)
  • Preheat the oven to 350ºF (180ºC). Butter a 9-inch (23cm) square cake pan.
  • Make the topping by crumbling together the butter, sugar, flour and cinnamon with your hands or a pastry blender until the pieces of butter are broken up and are about the size of small peas. Set aside.
  • To make the batter, in the bowl of stand mixer fitted with the paddle attachment, or by hand in a bowl using a spatula or wooden spoon, cream the butter, sugar and lemon zest together until light and creamy, about 3 minutes. Add the eggs one at a time, stopping the mixer a few moments after you add each egg to scrape down the sides of the bowl.
  • Sift together the flour, baking powder, baking soda, salt, and cinnamon or nutmeg into a medium-sized bowl. With the mixer on low speed, add half the flour mixture, then stir in the buttermilk.
  • Add the remaining flour mixture, mixing just enough so it’s barely incorporated (there will still be dry bits of unincorporated flour), then remove the mixer bowl from the machine and using a flexible spatula to gently fold in the blueberries in, just until they are incorporated. Do not overmix – you don’t want to smash the blueberries and stain the batter.
  • Scrape the batter into the prepared baking pan and smooth the top. Strew the topping over the blueberry batter and bake until the buckle is lightly browned on top and feels just set in the center; it’ll spring back lightly when you touch the center. It’ll take about 55 minutes.
  • When the buckle is almost finished baking, make the syrup by heating the lemon juice and sugar in a small saucepan over medium heat, cooking it until it thickens. It’s done when the bubbles get larger, and when removed from the heat (which you might want to do a couple of times while it’s cooking, to check), the consistency will be like warm maple syrup. It’ll take about 5 minutes.
  • 8. Remove the buckle from the oven and pour the warm lemon syrup over it, letting it soak in. Serve the buckle when it’s cool enough to slice. It’s good warm or at room temperature. Whipped cream or vanilla ice cream make nice accompaniments, although none are really necessary.

Note: I suggest using fresh berries. The frozen berries made the batter “clump” together and was a little difficult to spread out. The results were still delicious!

Pea Soup -Two Versions (updated)

Vegetarian:

1 cup of washed green split peas

8 cups of water

2 carrots, sliced

2 celery stalks with leaves, chopped

1 medium onion, diced

1 leek, sliced and washed (optional)

2 -3 cloves of garlic, minced (optional)

Sauté vegetables in a few tablespoons of olive oil until translucent, and then add the peas and the water.

Bring all ingredients to a boil and then simmer until peas are soft. Blend. Add salt to taste.

With a Ham Bone, or 1/2 of a 12 ounce package of salt pork, or a Ham Shank: I buy a seasoned, uncured ham shank in Whole Foods. The salt pork is also good, but you must discard it after the soup is ready. It’s too salty.

For this version, you will need: 1 1/2 cups of washed split peas, and 12 cups of water. Then same ingredients as above, plus add the leek and garlic; sauté vegetables in a few tablespoons of olive oil until translucent, and add the peas, water and ham. Simmer for about 2 hours until the ham is falling off the bone. Remove the meat, shred and return to the pan. Season to taste with salt, if necessary.

Before you put the shredded ham back in, if you wish, blend the soup.

This soup thickens as it stands.

Pernil

Recipe from Maricel Presilla, Adapted by Von Diaz
Watch the YouTube video, How To Make Puerto Rican Pernil | NYT Cooking

We made this over the Christmas holiday with a 4+ pound pork shoulder, and it was delicious. Definitely check out the video. This is not a difficult recipe.

INGREDIENTS

Yield: 8 to 10 servings

For the Adobo (see Notes)

  • 8 to 9 large garlic cloves, finely minced
  • 3 tablespoons olive oil
  • 5 teaspoons fresh sour orange juice (or equal parts lime and orange juice)
  • 4 teaspoons dried oregano
  • 8 to 9 teaspoons kosher salt
  • 1 teaspoon black pepper
  • For the Pork Shoulder
  • 1 (8- to 9-pound) bone-in, skin-on pork shoulder, preferably with skin covering the entire top layer
  • 1 teaspoon kosher salt
  • PREPARATION
  • Step 1: Prepare the adobo by combining all the ingredients and grinding in a large pilón or mortar and pestle, or simply mixing together well in a small bowl.
  • Step 2: Prepare the pork: Rinse and dry meat well with a clean towel. Place pork skin-side down on a large rimmed sheet pan and poke deep, 1-inch holes throughout the meat and in the fatty layer with a paring knife, being careful not to pierce the skin. You can’t have too many holes.
  • Step 3: Pour over adobo in batches, using your fingers to push adobo deep into the meat. If you’re worried about your hands smelling like garlic — which they will! — wear gloves.
  • Step 4: Set out a long sheet of plastic wrap, layering with subsequent sheets as needed to ensure you can securely wrap the entire pork shoulder. Transfer pork to plastic wrap and wrap tightly, adding sheets of plastic as needed to ensure pork is completely airtight and juices are contained. Let marinate in the fridge overnight if possible, or at least least 2 to 3 hours. Set on a rimmed baking sheet or disposable aluminum foil pan in case it leaks.
  • Step 5: Once the pork has marinated, heat oven to 400 degrees. Working over the sink, carefully remove pork from plastic wrap, discarding any remaining adobo. Place the marinated pork shoulder skin-side up in a deep roasting pan, and wipe the skin with a clean cloth. Rub skin with 1 teaspoon salt.
  • Step 6: Loosely tent foil over the pork shoulder, spraying the foil with cooking spray or brushing with oil in any areas that may touch the skin, as it will stick. Transfer to the center of the oven.
  • Step 7: * Roast in the oven for 1 hour, then carefully remove the foil and rotate the pan. Continue roasting for another 2 to 3 hours, rotating every hour or so, and watching closely. Add water to the pan as needed when juices evaporate. The meat is done cooking when the juices run clear and the thickest part of the shoulder registers 160 degrees with a meat thermometer. The skin may take more time to crisp, but watch closely so that it does not burn. Tap the top of the skin with the back of a knife or metal spatula, and listen for a decidedly hollow sound.
  • Step 8: Remove from the oven and let rest for 10 to 15 minutes, then transfer to a large cutting board. (For cleaning instructions for the pan, see Notes.) If desired, remove the skin from the roast by slicing it along the underside of the bone with a long, sharp, slender knife. Run the knife underneath the skin starting from the bottom until loosened, then lift the skin from the meat. Use kitchen shears to cut into serving pieces, and let them rest in the warm oven until ready to eat. Trim excess fat from the meat if desired, and slice as desired, in large chunks or slices, to serve.
  • Tips
  • You can use a smaller or larger pork shoulder, but calculate your adobo accordingly by using the following formula per pound of meat: 1 large garlic clove, 1 teaspoon olive oil, 1 teaspoon kosher salt, ½ teaspoon sour orange juice, ½ teaspoon dried oregano and ⅛ teaspoon black pepper. If using a smaller pork shoulder, you may want to reduce the amount of salt slightly.
  • Use a pan that can handle char. You can line your pan with foil, but that can be even messier. When you’re ready to clean, combine ½ cup baking soda and enough hot water to cover the burned spots, and let rest for half an hour. Char should release easily with your abrasive tool of choice.
  • *My observations: After one hour at 400F, we turned the oven down to 300F and roasted the pernil until it reached 160F on a meat thermometer. We were worried it was cooking too quickly.
  • I will try this the next time:
  • From the website Kitchen Gidget: When ready to cook, preheat oven to 350°F. Leave the roast covered with foil and bake for 4-5 hours, approximately 30-45 minutes per pound. Pork should read 180°F on an internal thermometer and shred easily with a fork.
  • Uncover roast and bake for 15-20 minutes to crisp up the fat, or broil at 500°F for 10 minutes, watching carefully not to burn.

Lemon Ricotta Pancakes

By Genevieve Ko

These are amazing and are delicious just by themselves. No topping is even necessary. (Watch on YouTube: Fluffy Lemon Ricotta Pancakes with Blueberry Syrup | Genevieve Ko | NYT Cooking)

INGREDIENTS

Yield: 8 to 10 small pancakes

  • ¾ cup/102 grams all-purpose flour
  • 1½ teaspoons baking powder
  • ¾ teaspoon fine salt
  • ¼ cup/50 grams granulated sugar
  • 1 lemon
  • 1½ teaspoons pure vanilla extract
  • 3 large eggs
  • ¾ cup/170 grams whole-milk ricotta
  • ¼ cup/61 grams buttermilk, preferably whole milk
  • 2 tablespoons/28 grams unsalted butter, melted, plus room-temperature butter for cooking and serving
  • Blueberry Syrup or other toppings, for serving (optional)
  • PREPARATION
  1. Step 1 Whisk the flour, baking powder and salt in a small bowl. Heat a griddle or large nonstick pan or well-seasoned cast-iron skillet over medium-low.
  2. Step 2 Add the sugar to a large bowl, then finely grate the zest of the lemon directly over the sugar. Using your fingers, gently rub the zest into the sugar. Add the vanilla and whisk to evenly moisten. Add the eggs and whisk until foamy on top, then add the ricotta, buttermilk and butter, and whisk until well blended. Add the flour mixture and gently stir until no traces of flour remain.
  3. Step 3 Generously butter the griddle, then drop a scant ¼ cup batter onto it. Repeat, spacing the rounds at least an inch apart. Cook until the bottoms are golden brown and the tops are bubbling, 2 to 3 minutes. Flip and cook until the other sides are golden brown, about 2 minutes more. Repeat with more butter and the remaining batter. Serve warm, slathered with butter and blueberry syrup or other toppings if you’d like.

Grandma Rosie’s Apple Pie

This recipe was passed down through our family. It was originally made with Crisco, and then margarine, but I use butter instead. It makes one large rectangular pie. (Pyrex® Oblong Baking Dish) Honestly, this is my best recipe. I will give you the exact measurements for the dough, how many apples to use, but the taste of the apples, after adding sugar, cinnamon, lemon juice, and a little flour, is up to you.

Dough:
Mix well, 3 cups all purpose flour
1/2 cup sugar
2 teaspoons baking powder 
A pinch of salt 

Add: Two sticks of cold unsalted butter

Cut butter into the flour so it resembles wet sand. Do not use your fingers; use 2 forks or your Kitchen Aid dough hook.

Add: 2 eggs
2 teaspoons vanilla 
Lemon juice (The recipe states that if the dough is too dry, add some lemon juice.  However, I always add lemon juice – 1-2 tablespoons. It makes a flakier crust.)
Refrigerate for at least one hour

Filling:
Peel and core 10-11 large apples, and cut into slices. (Use a selection of apples, including Honeycrisp.)
Add sugar, cinnamon and lemon juice to taste. (You might need more sugar than you think. Go slow.)
Add 2 tablespoons of flour.

Assemblage:
Preheat oven to 400F. Generously butter the baking dish. Remove one disc of dough from the refrigerator and, using a pin, roll it out on a lightly floured piece of parchment paper until it’s roughly the size of the dish. If dough is too wet, slowly sprinkle more flour onto the pin and the dough until it rolls smoothly. Place dish on top of dough, slide hand under parchment and then flip the dough over onto the plate. Carefully peel off parchment paper. Trim the dough and place aluminum foil, with dry beans on top, to keep the shape of the crust. (I usually trim the dough to just fit the bottom of the plate, so the sides of the dough don’t slide down.)

Bake at least 15 minutes, or until the dough feels a little firm.

Fill the crust with the prepared apples, *roll out the top dough, cover the pie, and brush with an egg wash (optional). Make slits in several places.

Turn oven down to 350° and bake until the dough is a little bit brown.
The apples will not be ready at this point. Loosely cover the pie with aluminum foil and turn down the oven to 300 or 325° to finish baking.

When you start to smell the pie, check to see if the apples are soft and juicy; it should be ready.

*After the top dough is rolled out, I roll it up in the parchment paper, shake out the excess flour, and unroll it onto the apples. Trim.